Newsletters have been a great source for my growth as an engineer. I’m subscribed in quite a few and I’ve even contributed to some. Unfortunately, I no longer have the time to sit down and read all the articles that piqued my interest. I’m always on the move for work or family matters or I will be doing chores at the house.
Making a podcast from the articles
Podcasts are the other source of learning things and keeping up with the latest trends. The fact that I can listen to them on idle time (commuting, chores) is why I keep on using them constantly.
A great feature that NotebookLM has is the creation of an audio file based on the resources you’ve provided. The fun part is that the audio is not a dry read through the gist of the resources. It is a rich dialogue between two characters much like a conversation in a regular podcast.
So one day I thought of combining the two and create a podcast from all the articles that I want to read but don’t have the time to. The result was good. Especially if I didn’t mix and match articles from different newsletters. What I didn’t like was the process. Each article had to be opened in its own tab since most newsletters don’t provide the direct link, then I had to copy the link, go to the notebook’s tab, paste it and repeat the steps for the next one.
What I wanted was to be able to right click on the newsletter’s link, save it to a list and when I’m done collecting links go to notebooklm and create a notebook from them.
Links in Bucket
I knew that this can be done through a chrome extension but I’ve never written one. Actually I’ve never written anything web related. In the past that would be the end of story. Nowadays, a couple of prompts and half an hour are all you need!
So, this is the initial prompt. It contains a quick summary of my need, a description of how I have imagine it work and the way it will used. Since I haven’t worked in this space before, I also asked the LLM to justify its decisions so that I will also learn a thing or two!
I am subscribed in various programming-related newsletter but I don’t have the time to read them all anymore. What I do have is a lot of commute time and a preferance into listening to podcasts.
So the use case is: i want to manually open a newsletter, pick the articles that i want to read and for them save their link in a “bucket”. When ready I want to be able to dump that “bucket” of links in notebookllm and ask it to create a podcast for me.
In more details: we need to create an extension for chrome-based browsers that provides two things: (1) when the user does a right click on a link the extension provides a “save to bucket” option that saves the link in a local storage. some times the link might not lead directly to the article because of attribution systems etc. the extension must save the final link that opens the article. (2) when the user does a right click on a text field it provides a “dump from bucket” option that fills the text field with the saved links, separated by a newline, and empties the bucket.
The extension is not intended to be upload to any store, i will be installing it from the file system.
Critical note: i am a seassoned software engineer but i’ve never build anything with javascript/typescript/bun. If possible use these technologies and provide detailed explanations of all the decisions in order to get familiarized with them.
After using the first outcome I quickly realized that I need to be able to remove links before dumping them:
we need to provide to the user the ability to remove links from her bucket. perhaps a list with all links and a small x or trash bin next to the link. if the number of the links is greater or equal to two then we need to provide a way to remove all them
If you want to take a look at the result you can find it here: https://github.com/le0nidas/links-in-bucket. I’ve also included the plans that were created by the two prompts since they include the explanations that I’ve mentioned.
Anyone working with Kotlin, especially in the android world, has dealt with RequireOptIn. Actually they had to deal with the consequence of its application which is to explicitly opt-in into using a piece of code that is annotated with it.
@RequiresOptIn
In a nutshell, if you want the consumer of your code to be fully aware that they are about to use it, you annotate the code with RequiresOptIn and that forces the consumer to annotate the call site with OptIn. Its like informing someone about the dangers of something and then having them sign that you have no responsibilities for anything that might happen to them.
@PreviewOnly
The problem
We have a composable, named renderList, that is part of module A and is being exposed to the rest of the project through another composable, named renderScreen:
This file contains hidden or bidirectional Unicode text that may be interpreted or compiled differently than what appears below. To review, open the file in an editor that reveals hidden Unicode characters.
Learn more about bidirectional Unicode characters
renderList knows how to render List instances and we want to preview this rendering but in another module. Using renderScreen is not possible because it also contains components that cannot be initialized when being in design time.
The solution
We are going to add one more composable in module A which will expose only the renderList:
This file contains hidden or bidirectional Unicode text that may be interpreted or compiled differently than what appears below. To review, open the file in an editor that reveals hidden Unicode characters.
Learn more about bidirectional Unicode characters
and to prevent its usage in production code we are going to add some friction with the @PreviewOnly annotation which underneath leverages @RequireOptIn:
This file contains hidden or bidirectional Unicode text that may be interpreted or compiled differently than what appears below. To review, open the file in an editor that reveals hidden Unicode characters.
Learn more about bidirectional Unicode characters
Or to be more exact, use a coding agent in a tool. This is my new starting point every time I begin to think of a tool I want to implement.
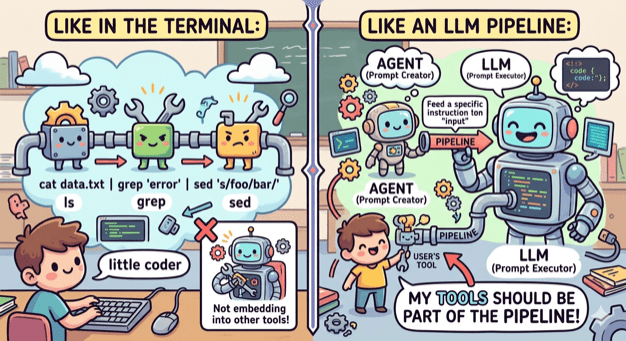
Being part of the pipeline
A couple of weeks ago I thought of creating an OpenCode agent that will check my uncommitted changes, construct a commit message and finally make the actual commit.
The first version was ok but I wanted to make a few changes. First I wanted the agent to follow certain guidelines, so I edited the agent file. Then I wanted to change the way it constructed the git command, so I edited the agent file. Finally I wanted to support the usage of GitButler, so I edited the agent file.
At that point I realized that I was violating the single responsibility principle big time. No matter the change I’ve kept editing the same component. And it hit me, fascinated by all the things I was able to do with a coding agent I failed to apply good engineering practices when it comes to the construction of tools.
Small coherent components that do one thing and do it well
When we write code we tend to break it into small modules, classes, functions that have one responsibility and provide a lean API. This way we can reuse components, combine them in different ways and replace them easily.
No need to do the opposite when it comes to tooling. The terminal has led the way by having small tools that do one thing (ls, grep, cat etc) and can be combined, by using pipes, into an entire workflow. My tools need to embrace that as well.
ai-commit.sh
So I broke my agent’s workflow into distinct components:
Create a single prompt from collecting all changes. This can be done by a bash script.
Feed the prompt to an agent that is configured to create a title and a message. This can be done by OpenCode with a custom agent.
Get the agent’s output and use it to make a commit using the appropriate tool. This can be done by a bash script.
I created the two scripts and also wrote one more that ties everything together: ai-commit.sh
In case you are wondering why Hemingway (or Hemi for the friends) is in the picture, it’s just the name I gave to what was left from the original agent: hemi.md
Pinky and Brain v2
Three months I wrote about Pinky and Brain, my agent/subagent duo that was helping me plan and execute a task while being in the loop. I was using it quite often but whenever I did I also saw the number of my available copilot requests decreasing fast! So I started avoiding it and preferred writing code manually like a caveman.
My setup was a testimony of using coding agent as a tool. It was doing everything. Apart from planning, that should be done by it, it was also looping through tasks, delegating work, making commits, asking for the user’s approval to continue looping. Many of these operations where new requests (x3 because of Opus).
So I sat down and broke that too:
Planning is still being make by an agent (Brain). Only this time it is not tied to a model and it is very restricted. It can only save the created tasks to beads which will be loaded as a skill.
Execution is still being done by an agent (Pinky). Only this time it is even more simpler. It is asked to just follow instructions nothing else.
Everything else is part of a bash script that (a) uses bd to get the next task, (b) provides its description as a prompt to Pinky, (c) closes the task when Pinky returns, (d) uses ai-commit.sh to create a commit, (e) loop again.
I’ve been using it for a couple of weeks now and I’m sure I have a better consumption of requests.
In a previous post we saw how to send a RecyclerView‘s scroll events to a compose parent so that we can leverage the top bar’s enter always scroll behavior. The result was good but not great. The top app bar was collapsing and expanding as expected but it was also rendering partially during the transition:
It should either be fully visible or fully hidden.
TopAppBarScrollBehavior
A TopAppBarScrollBehavior defines how an app bar should behave when the content under it is scrolled.
And it does that through its NestedScrollConnection property which provides methods that can be called in both scroll and fling event chains. Their implementation is what changes the bar’s state.
Now, as we saw in the previous post, the way to communicate the events is by using the NestedScrollDispatcher‘s dispatch methods.
Every dispatcher is being bundled with a NestedScrollConnection so, internally, whenever we dispatch an Offset we end up calling the connection’s API thus changing the top bar.
MyEnterAlwaysScrollBehavior
What we want is to have a top bar that will fully collapse when the user scrolls upwards and fully expand when she scrolls downwards. This way we’ll avoid the partial renderings.
The framework does provide this behavior out of the box but in order to leverage it fully you have to be in an all compose project. In our case, since we can’t have this pre/post notion of scroll chain, we are dispatching only pre scroll events. So we have to make it work in a custom component:
This file contains hidden or bidirectional Unicode text that may be interpreted or compiled differently than what appears below. To review, open the file in an editor that reveals hidden Unicode characters.
Learn more about bidirectional Unicode characters
This does what we want but it is a bit blunt. The top bar snaps instantly without any animation. Also, notice how it reacts to every tiny scroll movement:
Lets add some animation to the collapse/expand process, a couple of early returns to avoid changing the state if there is no point (already collapsed/expanded) and a small scroll buffer in order to avoid reacting immediately to the user’s gesture:
This file contains hidden or bidirectional Unicode text that may be interpreted or compiled differently than what appears below. To review, open the file in an editor that reveals hidden Unicode characters.
Learn more about bidirectional Unicode characters
Now this is better but notice how the bar behaves when we scroll slowly:
This is because the dispatcher keeps sending offsets while the bar’s height is between 0 and the height limit, meaning that the early returns do not apply here. Lets fixit by having an animationInProgress flag:
This file contains hidden or bidirectional Unicode text that may be interpreted or compiled differently than what appears below. To review, open the file in an editor that reveals hidden Unicode characters.
Learn more about bidirectional Unicode characters
Why stop here and not try to implement the exit until collapsed behavior too?
The idea is to hide the bar when the user scrolls upwards and keep it there until she can no longer scroll downwards. The first part is easy, if the available.y value is equal or greater that 0 we skip everything. The second part is a bit tricky since we don’t have access in this kind of information.
This is where we will leverage the dispatcher adapter from the previous post and enhance the onScrolled method with the check we need:
This file contains hidden or bidirectional Unicode text that may be interpreted or compiled differently than what appears below. To review, open the file in an editor that reveals hidden Unicode characters.
Learn more about bidirectional Unicode characters
If the user can no longer scroll downwards we dispatch a post scroll event. Notice that we provide Offeset.Zero in the available for scrolling parameter. This is crucial since we are going to base our implementation on that:
This file contains hidden or bidirectional Unicode text that may be interpreted or compiled differently than what appears below. To review, open the file in an editor that reveals hidden Unicode characters.
Learn more about bidirectional Unicode characters
So, we make the assumption that if the available offset is not zero the user can scroll further thus we return. If it is zero we animate the bar’s expansion:
Working on a task starts with the Plan agent. I provide an initial prompt of what I want to achieve and the agent responds with a plan. If the plan needs adjustments I ask the agent to update it. When I’m satisfied with the final outcome I move to the execution of the plan. This will happen in one of two ways:
If the context window is still small I simply change agents1 (move to Build) and ask it to proceed with the execution.
If the context window is already big I ask the agent to save the plan in a markdown file, start a new session and ask the Build agent to read the file and execute the plan.
This flow works but there are a few drawbacks that bother me:
There is no human in the loop. I end up reviewing all changes at the end of the execution.
Even if I start a new session, depending on the size of the plan, the context window might get big causing the agent to misbehave. Especially in changes that must be repeated.
I usually use Opus for planning and Haiku for execution. There are times though that I forget to make the change ending up using Opus for everything. Opus is good but is also expensive!
You can’t easily pause the flow and continue from where you stopped.
My new flow
My new flow is based on one agent, one subagent and a database. In particular:
Like before I start with an agent that will help me build a detailed plan that consists from a number of tasks.
When I’m happy with the plan I ask the agent to use Beads and save each task under an epic.
Then I ask the agent to start the execution loop.
Execution loop
The agent uses Beads to figure out which task must be executed. It changes its status to in_progress and asks the subagent to execute it.
The subagent reads the task, makes the necessary changes and informs the agent that it finished.
The agent asks me to review the changes and approve them or not.
If I approve the changes, the agent commits them, close the task and move to the next one.
If I request changes, the agent asks the subagent to make them. At this point we move to step 2 again. We remain at this inner loop until I give my approval.
I am finally in the loop. I review fewer changes at a time and sooner!
Using subagents for each task keeps both the agent’s and the subagent’s context window smaller and cleaner ending up in fewer, to none, misbehaviors.
Brain is tied with Opus and Pinky with Haiku. No need to remember to change anything!
The best of all, with Beads I can pause and resume whenever I want. The agent knows where to start from!
PS: if you are part of team and don’t want to pollute the codebase with various configurations, you can (a) init beads in stealth mode and (b) exclude .opencode folder from git
according to the docs, all primary agents share the main conversation hence share the same context window ↩︎
The idea of a command line tool that will fit my needs was planted quite a while a go. Couldn’t find the time or didn’t have the energy to act on it so it remained just that, an idea.
Until yesterday that I saw this video. At some point, beads gets mentioned. I was curious as to what it does exactly that decided that it was now or never: I created a repo, added beads to it, bought some credits in warp.dev and vibe coded the tool I had in mind!
This was the initial prompt:
This file contains hidden or bidirectional Unicode text that may be interpreted or compiled differently than what appears below. To review, open the file in an editor that reveals hidden Unicode characters.
Learn more about bidirectional Unicode characters
I am an engineering manager and I want to create a terminal tool, named n, that will allow me to take quick notes about my reports.
The idea is that whenever I want to note something down about one of my reports I will open a terminal and write: n <reports name> <my note>.
The notes must be organized in markdown files named after the report name. For example if I write "n leonidas a simple note" the tool must create a file named "leonidas.md".
The note must be added to the file under a header with the current datetime in the format YYYY/MM/DD hh:mm:ss.
For example:
"n leonidas one note" and "n leonidas another note" will result in:
## 2026/01/03 14:16:03
one note
## 2026/01/03 18:20:00
another note
The tool must be configurable. It will read its configuration from "~/.n/config". Its first configurable setting is the folder where it saves the markdown files. By default it saves them in "~/.n/db/".
The first the user runs the tool it checks if config exists and if not it creates it alongside the db folder.
I don't know which technology to use so I want you to help me decide and then create a plan for implementing the tool using the selected technology.
Warp provided a few options with their pros and cons. I chose Go and asked it to provide an initial plan. It did, I accepted it and after a couple of minutes I had a first version of my tool.
Watching the tool working was a pivotal moment. The “features gate” opened and all those ideas just poured out. Here is where beads saved the day.
Beads
The description in its repo is
A memory upgrade for your coding agent
The idea is to provide to your coding agent a way to create tasks keeping its context window small and its concentration at the task at hand. The initial setup is provided by the tool and leverages conventions like AGENTS.md, CLAUDE.md etc
I guess I didn’t push the agent enough to make it create tasks on its own but the fact that I had a tool to save all those ideas and then prompt the agent to “Lets work on the next task” put me in a great flow:
I was asking the agent to work on the next task
While it was working I was playing around with n and adding tasks to beads with either bugs or new features
Go to step 1
That cycle kept me going for a couple of hours!
A simple command-line tool for taking quick notes about your reports.
I’ve always been a terminal guy. Seeing how coding agents increased even more the time I spent to it made me realize that the way I keep notes about my reports must migrate to the terminal too.
The idea is simple. Every time I want to note something down I write:
n name note
this creates a folder name and in that folder a file with the current date which contains the note.
The tool provides a way to tag, edit and delete notes. It provides a way to backup your notes using github and a few ways to see your notes about a report.
Its not much and I know there are better tools out there but this one is exactly as I want it and was implemented in an afternoon!
PS1: I vibe coded it which means that I did not see at the code at all. Don’t judge it 😛 ! PS2: The idea of having all notes in files is to provide them later on in an LLM and have a conversation to figure out the report’s growth.
use gh and tell me how many PRs I have authored the last 3 weeks. from these PRs how many are merged? what was the total of added and removed lines?
Your PR Statistics (Last 3 Weeks)
 - Total PRs authored: 31
 - Merged PRs: 27 (87% merge rate)
 - Total lines added: 4,095
 - Total lines removed: 2,758
 - Total lines changed: 6,853
You've been quite productive! Most of your PRs from the last 3 weeks are merged, with a solid mix of refactoring and feature work.
Up until now the main way of using LLMs was through chat. Every time I wanted to do a deep dive on a technical issue I was starting a conversation through which I was getting a better understanding both on the code and the way it should be used.
I had played with the agent tab of copilot in android studio but never given it too much time. That was the reason I believed that it is not that good!
So, I decided to give it a real shot and use it foul time, on production code, in a project that is important. The goal was to write as little code as possible.
The workflow I ended up having
Understand the task at hand and create a mental model of the solution.
Figure out the steps I need to make in order to implement the solution. If the steps are too many I break them into groups.
Start writing these [group of] steps in a prompt where I ask the agent to provide me a plan with the intended changes.
Review the plan, ask the agent to make adjustments (repeat this step as many times as needed).
Ask the agent to save the plan in a markdown file.
Ask the agent to execute the plan.
Review the changes.
If something trivial needs to be changed I do it myself, if the change cascades through many files I tell the agent to do it.
In the second case I also request an update to the plan.
Final review, commit and push.
The prompts must not be too detailed but also not too general. For example:
Take a look at <file #1> and <file #2> and give me a plan with all needed changes in order to:
   1. Start <component #1> as disabled
   2. Enable it every time the user selects an address (<component #2>) or
   3. Enable it every time the user is typing a new zipcode (<component #3>)
Mistakes
It goes without saying that to end up in the above workflow I did many mistakes. Here are the big ones.
Provide the outcome
At first my prompts were a simple description of the outcome I wanted. I thought it will figure things out, make the necessary connections and write exactly what we need. Nope. The agent knows what you allow it to and when it can’t find something it simply creates random solutions.
Straight to the execution
My interaction with the agent was starting by asking it to do something. No plan at all. In simple cases this might be fine but when having a change that touches many components, a simple adjustment, after the agent’s work, might end up in updating a lot of code or in more adjustments.
Getting greedy, asking too much
After making some progress and saw how effective I was I got greedy. I started asking too much from the start and ended up with massive PRs that included changes often unrelated to each other.
Tips
Always have a plan first
For me having a plan gives me ease. I am more certain that things will be done as intended because they will be done they way I want to!
Through the process of making the plan there will be times that you will understand better the code at hand and figure out missing cases.
Especially for repetitive tasks the plan speeds things tremendously: I had to migrate a few screens from one pattern to another. I did the first migration using the agent (through a plan etc) and when finished I asked it to change the plan in such a way that will accept “parameters”. After that I just fed the updated plan with the next screen to the agent.
It is a memory that can be fed in any agent, in a clean context window, at any time.
Use the agent to figure things out
Some times in order to build the mental model for the solution you need to understand the code better. Use the agent to do that. See how it articulates things and then ask it to save its findings in a file. That file can be part of the plan:
see how component A works by reading file <name>
Always review the code
Perhaps the most important tip of all. Don’t add code to the project that you don’t know what it does. Always review what the agent did. Make sure that it follows the project’s conventions and standards. The fact that it was written by an agent does not mean that it is not your code. You are responsible for it. It is your solution, you just used a different medium to implement it.
Explore more, it is fast now
The benefit of having a tool that implements your thoughts way faster than you is that you can explore multiple solutions! Use git to make different branches/checkpoints and try every approach you thought of.
Keep things small
You can use an agent to implement an entire task but if you break it and do groups of changes then your reviews will be easier and quicker which means that your understanding of the changes will be better.
Bonus
I keep a repo with the Gilded Rose kata. Every now and then I create a new branch and practice on the kata.
This time the practice required to use only an agent. You can see the branch here and the prompts I used here (i asked the agent to save them to a file).
We have an app that relies heavily on fragments. Every screen is an activity that hosts a fragment that hosts a recycler view:
We want to start migrating the screens to compose by keeping the screen’s content and placing it in a compose environment. This means that our activities will call setContent { } instead of setContentView() and that our top and bottom bars will be written in compose. Also, a must have requirement is that the top bar has to react to the user’s scroll by collapsing and expanding.
Using Scaffold and AndroidFragment
Scaffold offers, among others, slots for both bars. It also provides wiring between the screens’ components so that we can easily add support for various interactions. In our case we want to leverage top bar’s enter always scroll behavior. AndroidFragment is a composable that takes care the instantiation and hosting of a fragment.
Putting them together we start we something like this:
This file contains hidden or bidirectional Unicode text that may be interpreted or compiled differently than what appears below. To review, open the file in an editor that reveals hidden Unicode characters.
Learn more about bidirectional Unicode characters
As you can see the list renders fine but, even though we’ve setup the wiring, the top bar does not collapse/expand when we scroll.
NestedScrollConnection and NestedScrollDispatcher
Scrolling in compose is a bit different from the view systems’. When a scroll event happens, instead of just one composable handling it, multiple composables can participate and decide how much of that scroll they want to consume.
To achieve that, compose provides three components:
NestedScrollConnection which is for parents to listen and consume
NestedScrollDispatcher which is for children to dispatch events and
the .nestedScroll() modifier which is the way to integrate these to the hierarchy
This means that if we want a parent composable to react to scroll events we need to provide a connection to it. If we want one of its the children to emit those events we need to provide to it that same connection and a dispatcher. .nestedScroll internally creates a NestedScrollNode which is used to couple the connection and the dispatcher together.
So, for our case, we have to create a dispatcher, couple it with the scroll behavior’s connection and provide it to our recycler view. Then the view will use it to dispatch its scroll events.
fun RecyclerView.setNestedScrollDispatcher()
Looking at the dispatcher’s API we can see that it provides two methods to dispatch scroll events. The first one, dispatchPreScroll, will inform the that a scroll is about to take place and that it will consume a certain distance. The second one, dispatchPostScroll, will inform that a scroll took place, it consumed a certain distance and has left some for consumption.
In the compose world all that makes sense. The scrollable modifier handles a scroll delta and communicates it properly in pre and post events. In the view world we don’t have anything similar. We can implement the logic using gesture detectors and by intercepting touch event but we can start simpler with a OnScrollListener:
This file contains hidden or bidirectional Unicode text that may be interpreted or compiled differently than what appears below. To review, open the file in an editor that reveals hidden Unicode characters.
Learn more about bidirectional Unicode characters
This file contains hidden or bidirectional Unicode text that may be interpreted or compiled differently than what appears below. To review, open the file in an editor that reveals hidden Unicode characters.
Learn more about bidirectional Unicode characters
When dispatching the y delta we need to negate its sign because RecyclerView and Compose use opposite sign conventions for scroll direction.
We coupled the connection with the dispatcher in the AndroidFragment because the created NestedScrollNode will try to find a parent node to dispatch its events too.
As you can see from the video the implementation works. The top bar collapses and expands accordingly. The only problem is that when the user starts scrolling slowly the top bar jiggles creating an unpleasant UX.
After adding some logs we can see that the scrolled dy is not always positive or negative through out the gesture:
NestedScrollDispatcher  gr.le0nidas.fragmentincompose        D  onScrolled: dy=3
NestedScrollDispatcher  gr.le0nidas.fragmentincompose        D  onScrolled: dy=1
NestedScrollDispatcher  gr.le0nidas.fragmentincompose        D  onScrolled: dy=6
NestedScrollDispatcher  gr.le0nidas.fragmentincompose        D  onScrolled: dy=-3
NestedScrollDispatcher  gr.le0nidas.fragmentincompose        D  onScrolled: dy=6
NestedScrollDispatcher  gr.le0nidas.fragmentincompose        D  onScrolled: dy=-4
NestedScrollDispatcher  gr.le0nidas.fragmentincompose        D  onScrolled: dy=10
NestedScrollDispatcher  gr.le0nidas.fragmentincompose        D  onScrolled: dy=-7
The slow movement is making the framework think that we are constantly trying to move a little bit up and immediately a little bit down. This causes the jiggle since the top bar toggles constantly between collapsing and expanding.
VerticalMovementDetector
We can prevent this by determining what kind of movement we have and then ignore any deltas that are not part of that movement.
To do that we need to have a window of n deltas and then see if the majority of them is positive or negative which will mean that the user scrolls down or up respectively. After knowing that we simply ignore the deltas that we don’t want.
A couple of things that help in the UX:
Until we fill that window we do not dispatch anything.
After filling it we make sure that we keep the last n deltas. That way we can determine the movement even if the user does one continuous gesture.
This file contains hidden or bidirectional Unicode text that may be interpreted or compiled differently than what appears below. To review, open the file in an editor that reveals hidden Unicode characters.
Learn more about bidirectional Unicode characters
Here is the entire code where we’ve added a sampling switch in order to keep things cleaner and avoid weird edge cases:
This file contains hidden or bidirectional Unicode text that may be interpreted or compiled differently than what appears below. To review, open the file in an editor that reveals hidden Unicode characters.
Learn more about bidirectional Unicode characters
Part of the work involves replacing the annotations the first library is using with the ones from the second. Unfortunately some cases are not as simple as replacing foo with boo. For example, a property must be annotated with @JsonField(name = ["a_name_here"]) in LoganSquare and @SerialName("a_name_here") is kotlinx.
So, I had to decide:
Do I spend 2-3 hours and migrate 100+ files manually, one by one?
Do I cut the hours in half by using the search and replace tool and then fix anything the tool couldn’t manage?
Do I start a journey of unknown number of hours to figure out how to perform the migration using a local LLM?
Ollama
Yeap, I chose to go with number three! And to do that I started by installing Ollama. Ollama is a tool that allows you to download open source LLMs and start playing with them locally. All prompts are handled in your device and there is no network activity.
You can either download it from its site or, if you are on macOS, use brew: brew install ollama.
After that you can run one of the models it provides, ex: ollama run llama3.2 or fire up the server it comes with and start playing with its API: ollama serve
Kotlin
The flow is simple:
Load in memory, one by one, the contents of the files that must be migrated
Provide each content along side with a prompt to an LLM
Store the LLM’s result to the file
(optional) Start dancing for building your first LLM based workflow
Reading the contents and writing them back to the files is easy with Kotlin. Communicating with the ollama server is also easy when using OkHttp and kotlinx.serialization. Believe it or not the most time consuming part was figuring out the prompt!
After a lot of attempts the one prompt that managed to produced the best result was the one where I listed the steps that I would have done manually:
We have a file written in Kotlin and we need to migrate it from LoganSquare to KotlinX Serialization.

To do that we have to replace:
- "import com.bluelinelabs.logansquare.annotation.JsonField" with "import kotlinx.serialization.SerialName"
- "import com.bluelinelabs.logansquare.annotation.JsonObject" with "import kotlinx.serialization.Serializable"
- "@JsonObject\ninternal class <class name>" with "@Serializable\ninternal class <class name>"
- "@JsonObject\nclass <class name>" with "@Serializable\nclass <class name>"
- "@JsonField(name = ["<property name>"])" with "@SerialName("<property name>")"

Everything else in the file should be copied without any changes.

Please migrate the following file:
$contents

We just want the file. Don't comment on the result.
and even then, small details did matter a lot.
For example, at the beginning of the prompt I refer to a file but later in the text I was saying Please migrate the following class. That alone was resulting in various weird migrations where a class was either missing completely or had only half of its initial code. Same results when I wasn’t using \n after the annotations.
The code
This file contains hidden or bidirectional Unicode text that may be interpreted or compiled differently than what appears below. To review, open the file in an editor that reveals hidden Unicode characters.
Learn more about bidirectional Unicode characters
Was I faster than choice number two? Didn’t try this choice but I guess no. Too many things to learn, figure out and write. Do I regret it? No! I now have a new tool in my belt and I’m pretty sure it will pay off, time wise, in the future.
ollama-kotlin-playground
One more thing that came out of this endeavour is ollama-kotlin-playground. A very simple library that does only one thing: generate a completion without even supporting all possible parameters. It is my way of not copying code from one tool/experiment to another.
It took me two and half years to come to terms with my new role. So, why now? I guess its a process like everything else. You start something new and feel completely out of your league. You educate yourself and try to apply your learnings. You make mistakes and feel awful. You try something else, make progress and feel better. A roller coaster of feelings! But you keep on pushing and some day you wake up knowing exactly what your job is.
The individual contributor to engineering manager transition
I don’t know about other industries but in software development the transition from an IC to EM is a bit hard. You have to leave a role where everything can be solved with code and where you can showcase your progress and your skills and move to a role that you might not write code for weeks!
So it took me all that time to accept the transition and most importantly to embrace the fact that it is OK to do or not to do a few things.
It’s OK to…
It’s OK not knowing everything and not having all the answers. My job is not to be a dictionary. My job is to be there, help in the research and assist on picking the more suitable solution.
It’s OK not solving everything myself. My job is not being a 10x developer. My job is building a 10x team. So when a problem occurs, I have to define it properly, set a few guidelines and let someone else do the solving.
It’s OK not being the first figuring out that there is a problem. Being a leader does not mean that I have to monitor everything and prevent problems before they occur. My job is to listen when someone brings an issue, assess the situation and prioritise any work that needs to be done while having the best interest of both the team and the codebase.
It’s OK not writing code that much. My job is not measured by the features I implement any more. My job is measured by the features my team is implementing and the level of quality the project has. I might not write code but I do write everything else. Goals, guidelines and documents that will help the team align and work towards the same end.
It’s OK not to be the first to speak. I’m not here to be heard. My job is to foster an environment where everyone has a say.
It’s OK not be right, it’s OK to ask for help. Being in a leading position does not mean you have to do everything perfect. My job is to build a healthy team that its members support each other. What a better way to do that by setting the example that we can all be wrong from time to time and that we will need someone to guide us.
Changing my status
I truly believe that a title in LinkedIn, or anywhere else, does not mean a thing on its own. Having said that I will be updating my title in LinkedIn because (a) I finally feel more comfortable with my role and (b) it is a psychological hack to help me invest even more in my new craft.
PS: I will still answer software engineer when someone asks me what I do for a living 😛