Working with checkpoints

There are times that my workflow involves a lot of small and consecutive commits. Commits that their message does not really matter since I will squash them into one that describes my work.

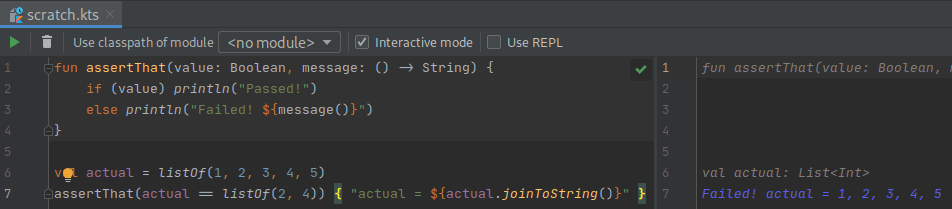
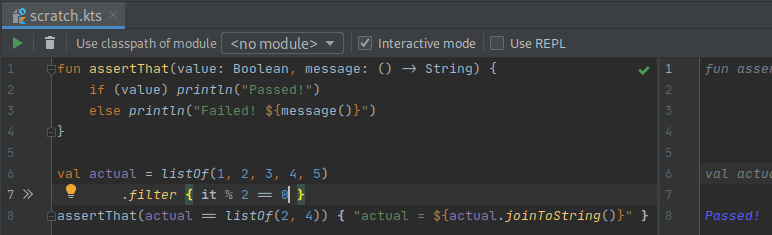
An example is when TDDing a certain functionality. In that case I usually write the test, make it pass and finally make a commit.

Why am I doing that? I see it like small checkpoints. I conclude a part of the functionality so I save it. This helps in restoring my code back to last point that I was happy with its state.

One commit

When I first started working this way I was making a distinct checkpoint for each part. Soon enough I realized that these commits didn’t provide any value. I was making them quick for just saving the code and their message was something like save or checkpoint or t.

So instead of doing this and having to squash lots of commits I started using amend. One commit for the first checkpoint and amend for the rest of them. This way, when I’m finished, I rename the HEAD of the branch to something descriptive and move on.

Lots of steps for one commit

I write my code using an IDE (Android Studio or Intellij IDEA) but when it comes to git I move to a terminal.

This means that for committing I have to (1) move to the terminal, (2) make the proper commit/amend and (3) move back to the IDE. Three steps for one save!

Alt + P

So I decided to fix it.

First the bash script that makes the commit:

#!/bin/bash
CHECKPOINT="checkpoint"
git add .
if [[ "$(git log –format=%B -n 1 HEAD | cat)" == "$CHECKPOINT" ]]; then
git commit –amend –no-edit
else
git commit -m"$CHECKPOINT"
fi
view raw checkpoint.sh hosted with ❤ by GitHub

A simple script that either makes a commit with the message checkpoint or amends the staged changes.

Second the import of this script to the IDE:

The Intellij platform provides a functionality called External Tools:
– Go to Settings -> Tools -> External Tools and click on the add button.
– Set the path of your script where it says Program .
– Disable the Open console for tool output if you don’t want to see the result of your script.

At this point you can either use checkpoint as an action (double shift, type checkpoint) or you can go a step further and create a keyboard shortcut:

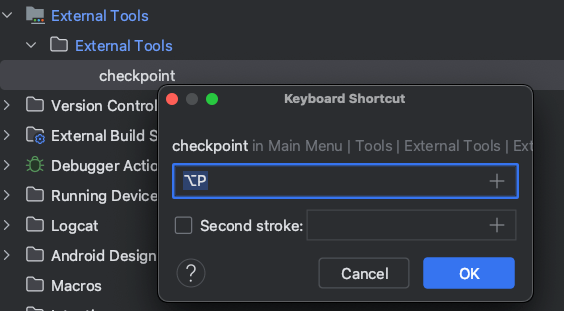
Go to Settings -> Keymap -> External Tools -> Right click on the script -> Add Keyboard shortcut.

So now every time I want to create a checkpoint I simple press `Alt + P` and continue working without moving from one program to another!

Know your tools: $SELECTION$ in Intellij IDEA

I have used and created Live Templates before but I didn’t know about the special keyword $SELECTION$. I found out after reading IntelliJ IDEA / Android Studio Tricks: Surround With by Ivan Morgillo.

In short, when a template gets invoked, $SELECTION$ gets replaced by whatever is selected at that moment.

I won’t go into details about creating a new template. You can read all about it at Ivan’s post. But when you learn how to create one then add the following:

This way you can do something like this:

PS: the $END$ keyword is another special one that pinpoints where the cursor will stop after adding values for an invoked template

Know your tools: scratch files in IntelliJ IDEA

I’ve used scratch files in IntelliJ IDEA and Android Studio but I think that can be found in all of Jetbrain’s products.

What are they?

Scratch files are files that don’t get tracked by the version control system, can be created at any given time and, most importantly, get bind to the IDE and not the project that is currently open.

How do I create them?

The simplest way is to hit ctrl+alt+shift+insert. If you can’t remember it press shift twice and start writing scratch, you will be presented with the action of creating a new one.

The next step is to choose what kind of file you want to create and this is where it gets interesting since you can choose from a plethora of file types. From plain text, to markdown, Kotlin, JSON, XML, ruby and many many more!

How do I use them?

By choosing the file’s type you choose how the IDE will behave when you are working on it, so if you create a scratch.json and paste some json in it you can format it accordingly. Or if you create a scratch.md you can start writing in markdown and have a preview of your work.

But the most powerful aspect of those files is when you create code related ones. If, for example, you create a scratch.kts file and start writing some Kotlin in it, you will see your code being run on the fly presenting to you its result:

TDDish

You can even work test first if you need to figure out a quick algorithm and have your test run in every change you make!

I usually start with an assertThat function and a failing test and go from there:

failing

Its a simple one but you get the point:

passing