Anyone working with Kotlin, especially in the android world, has dealt with RequireOptIn. Actually they had to deal with the consequence of its application which is to explicitly opt-in into using a piece of code that is annotated with it.
@RequiresOptIn
In a nutshell, if you want the consumer of your code to be fully aware that they are about to use it, you annotate the code with RequiresOptIn and that forces the consumer to annotate the call site with OptIn. Its like informing someone about the dangers of something and then having them sign that you have no responsibilities for anything that might happen to them.
@PreviewOnly
The problem
We have a composable, named renderList, that is part of module A and is being exposed to the rest of the project through another composable, named renderScreen:
This file contains hidden or bidirectional Unicode text that may be interpreted or compiled differently than what appears below. To review, open the file in an editor that reveals hidden Unicode characters.
Learn more about bidirectional Unicode characters
renderList knows how to render List instances and we want to preview this rendering but in another module. Using renderScreen is not possible because it also contains components that cannot be initialized when being in design time.
The solution
We are going to add one more composable in module A which will expose only the renderList:
This file contains hidden or bidirectional Unicode text that may be interpreted or compiled differently than what appears below. To review, open the file in an editor that reveals hidden Unicode characters.
Learn more about bidirectional Unicode characters
and to prevent its usage in production code we are going to add some friction with the @PreviewOnly annotation which underneath leverages @RequireOptIn:
This file contains hidden or bidirectional Unicode text that may be interpreted or compiled differently than what appears below. To review, open the file in an editor that reveals hidden Unicode characters.
Learn more about bidirectional Unicode characters
In a previous post we saw how to send a RecyclerView‘s scroll events to a compose parent so that we can leverage the top bar’s enter always scroll behavior. The result was good but not great. The top app bar was collapsing and expanding as expected but it was also rendering partially during the transition:
It should either be fully visible or fully hidden.
TopAppBarScrollBehavior
A TopAppBarScrollBehavior defines how an app bar should behave when the content under it is scrolled.
And it does that through its NestedScrollConnection property which provides methods that can be called in both scroll and fling event chains. Their implementation is what changes the bar’s state.
Now, as we saw in the previous post, the way to communicate the events is by using the NestedScrollDispatcher‘s dispatch methods.
Every dispatcher is being bundled with a NestedScrollConnection so, internally, whenever we dispatch an Offset we end up calling the connection’s API thus changing the top bar.
MyEnterAlwaysScrollBehavior
What we want is to have a top bar that will fully collapse when the user scrolls upwards and fully expand when she scrolls downwards. This way we’ll avoid the partial renderings.
The framework does provide this behavior out of the box but in order to leverage it fully you have to be in an all compose project. In our case, since we can’t have this pre/post notion of scroll chain, we are dispatching only pre scroll events. So we have to make it work in a custom component:
This file contains hidden or bidirectional Unicode text that may be interpreted or compiled differently than what appears below. To review, open the file in an editor that reveals hidden Unicode characters.
Learn more about bidirectional Unicode characters
This does what we want but it is a bit blunt. The top bar snaps instantly without any animation. Also, notice how it reacts to every tiny scroll movement:
Lets add some animation to the collapse/expand process, a couple of early returns to avoid changing the state if there is no point (already collapsed/expanded) and a small scroll buffer in order to avoid reacting immediately to the user’s gesture:
This file contains hidden or bidirectional Unicode text that may be interpreted or compiled differently than what appears below. To review, open the file in an editor that reveals hidden Unicode characters.
Learn more about bidirectional Unicode characters
Now this is better but notice how the bar behaves when we scroll slowly:
This is because the dispatcher keeps sending offsets while the bar’s height is between 0 and the height limit, meaning that the early returns do not apply here. Lets fixit by having an animationInProgress flag:
This file contains hidden or bidirectional Unicode text that may be interpreted or compiled differently than what appears below. To review, open the file in an editor that reveals hidden Unicode characters.
Learn more about bidirectional Unicode characters
Why stop here and not try to implement the exit until collapsed behavior too?
The idea is to hide the bar when the user scrolls upwards and keep it there until she can no longer scroll downwards. The first part is easy, if the available.y value is equal or greater that 0 we skip everything. The second part is a bit tricky since we don’t have access in this kind of information.
This is where we will leverage the dispatcher adapter from the previous post and enhance the onScrolled method with the check we need:
This file contains hidden or bidirectional Unicode text that may be interpreted or compiled differently than what appears below. To review, open the file in an editor that reveals hidden Unicode characters.
Learn more about bidirectional Unicode characters
If the user can no longer scroll downwards we dispatch a post scroll event. Notice that we provide Offeset.Zero in the available for scrolling parameter. This is crucial since we are going to base our implementation on that:
This file contains hidden or bidirectional Unicode text that may be interpreted or compiled differently than what appears below. To review, open the file in an editor that reveals hidden Unicode characters.
Learn more about bidirectional Unicode characters
So, we make the assumption that if the available offset is not zero the user can scroll further thus we return. If it is zero we animate the bar’s expansion:
We have an app that relies heavily on fragments. Every screen is an activity that hosts a fragment that hosts a recycler view:
We want to start migrating the screens to compose by keeping the screen’s content and placing it in a compose environment. This means that our activities will call setContent { } instead of setContentView() and that our top and bottom bars will be written in compose. Also, a must have requirement is that the top bar has to react to the user’s scroll by collapsing and expanding.
Using Scaffold and AndroidFragment
Scaffold offers, among others, slots for both bars. It also provides wiring between the screens’ components so that we can easily add support for various interactions. In our case we want to leverage top bar’s enter always scroll behavior. AndroidFragment is a composable that takes care the instantiation and hosting of a fragment.
Putting them together we start we something like this:
This file contains hidden or bidirectional Unicode text that may be interpreted or compiled differently than what appears below. To review, open the file in an editor that reveals hidden Unicode characters.
Learn more about bidirectional Unicode characters
As you can see the list renders fine but, even though we’ve setup the wiring, the top bar does not collapse/expand when we scroll.
NestedScrollConnection and NestedScrollDispatcher
Scrolling in compose is a bit different from the view systems’. When a scroll event happens, instead of just one composable handling it, multiple composables can participate and decide how much of that scroll they want to consume.
To achieve that, compose provides three components:
NestedScrollConnection which is for parents to listen and consume
NestedScrollDispatcher which is for children to dispatch events and
the .nestedScroll() modifier which is the way to integrate these to the hierarchy
This means that if we want a parent composable to react to scroll events we need to provide a connection to it. If we want one of its the children to emit those events we need to provide to it that same connection and a dispatcher. .nestedScroll internally creates a NestedScrollNode which is used to couple the connection and the dispatcher together.
So, for our case, we have to create a dispatcher, couple it with the scroll behavior’s connection and provide it to our recycler view. Then the view will use it to dispatch its scroll events.
fun RecyclerView.setNestedScrollDispatcher()
Looking at the dispatcher’s API we can see that it provides two methods to dispatch scroll events. The first one, dispatchPreScroll, will inform the that a scroll is about to take place and that it will consume a certain distance. The second one, dispatchPostScroll, will inform that a scroll took place, it consumed a certain distance and has left some for consumption.
In the compose world all that makes sense. The scrollable modifier handles a scroll delta and communicates it properly in pre and post events. In the view world we don’t have anything similar. We can implement the logic using gesture detectors and by intercepting touch event but we can start simpler with a OnScrollListener:
This file contains hidden or bidirectional Unicode text that may be interpreted or compiled differently than what appears below. To review, open the file in an editor that reveals hidden Unicode characters.
Learn more about bidirectional Unicode characters
This file contains hidden or bidirectional Unicode text that may be interpreted or compiled differently than what appears below. To review, open the file in an editor that reveals hidden Unicode characters.
Learn more about bidirectional Unicode characters
When dispatching the y delta we need to negate its sign because RecyclerView and Compose use opposite sign conventions for scroll direction.
We coupled the connection with the dispatcher in the AndroidFragment because the created NestedScrollNode will try to find a parent node to dispatch its events too.
As you can see from the video the implementation works. The top bar collapses and expands accordingly. The only problem is that when the user starts scrolling slowly the top bar jiggles creating an unpleasant UX.
After adding some logs we can see that the scrolled dy is not always positive or negative through out the gesture:
NestedScrollDispatcher  gr.le0nidas.fragmentincompose        D  onScrolled: dy=3
NestedScrollDispatcher  gr.le0nidas.fragmentincompose        D  onScrolled: dy=1
NestedScrollDispatcher  gr.le0nidas.fragmentincompose        D  onScrolled: dy=6
NestedScrollDispatcher  gr.le0nidas.fragmentincompose        D  onScrolled: dy=-3
NestedScrollDispatcher  gr.le0nidas.fragmentincompose        D  onScrolled: dy=6
NestedScrollDispatcher  gr.le0nidas.fragmentincompose        D  onScrolled: dy=-4
NestedScrollDispatcher  gr.le0nidas.fragmentincompose        D  onScrolled: dy=10
NestedScrollDispatcher  gr.le0nidas.fragmentincompose        D  onScrolled: dy=-7
The slow movement is making the framework think that we are constantly trying to move a little bit up and immediately a little bit down. This causes the jiggle since the top bar toggles constantly between collapsing and expanding.
VerticalMovementDetector
We can prevent this by determining what kind of movement we have and then ignore any deltas that are not part of that movement.
To do that we need to have a window of n deltas and then see if the majority of them is positive or negative which will mean that the user scrolls down or up respectively. After knowing that we simply ignore the deltas that we don’t want.
A couple of things that help in the UX:
Until we fill that window we do not dispatch anything.
After filling it we make sure that we keep the last n deltas. That way we can determine the movement even if the user does one continuous gesture.
This file contains hidden or bidirectional Unicode text that may be interpreted or compiled differently than what appears below. To review, open the file in an editor that reveals hidden Unicode characters.
Learn more about bidirectional Unicode characters
Here is the entire code where we’ve added a sampling switch in order to keep things cleaner and avoid weird edge cases:
This file contains hidden or bidirectional Unicode text that may be interpreted or compiled differently than what appears below. To review, open the file in an editor that reveals hidden Unicode characters.
Learn more about bidirectional Unicode characters
kotlin-parcelize is a great tool. Its simple to use and it helps in avoiding writing a lot of boilerplate code. There are times though that we need to take control of writing and reading to/from the parcel. One of these times is to cut down a few bytes from it (TransactionTooLargeException I am looking at you).
Meet me in the middle
@Parcelize takes full control and creates everything. Without the annotation, the developer has to do this on her own. Parceler lives in the middle of this spectrum. The plugin will create all necessary methods and classes but the actual write and read to/from the parcel will be the developer’s responsibility.
Without a Parceler the write/read looks like this:
This file contains hidden or bidirectional Unicode text that may be interpreted or compiled differently than what appears below. To review, open the file in an editor that reveals hidden Unicode characters.
Learn more about bidirectional Unicode characters
with a Parceler like this (where the Companion object is acting as a Parceler):
This file contains hidden or bidirectional Unicode text that may be interpreted or compiled differently than what appears below. To review, open the file in an editor that reveals hidden Unicode characters.
Learn more about bidirectional Unicode characters
This file contains hidden or bidirectional Unicode text that may be interpreted or compiled differently than what appears below. To review, open the file in an editor that reveals hidden Unicode characters.
Learn more about bidirectional Unicode characters
which, creates a parcel of 248 bytes. The code does not do anything weird. All primitives, which include the value classes too, are well handled. So nothing to do here. This leaves parcelables and enums.
But first, let’s use a Parceler. This means that writing and reading to/from the parcel has to be implemented by us. For starters, we will do exactly what the generated code does except for the attachment property. For that, the generated code uses parcelable’s methods and CREATOR. In the Parceler we don’t have access to the CREATOR.
This file contains hidden or bidirectional Unicode text that may be interpreted or compiled differently than what appears below. To review, open the file in an editor that reveals hidden Unicode characters.
Learn more about bidirectional Unicode characters
That leaves us with writeParcelable and readParcelable but now the parcel’s size is bigger, it is 328 bytes! Turns out that writeParcelable first writes the parcelable’s name and then the parcelable itself!
We need to use the CREATOR. After searching around I found parcelableCreator. A function that solved a well-known problem and will be added to Kotlin 1.6.20.
This file contains hidden or bidirectional Unicode text that may be interpreted or compiled differently than what appears below. To review, open the file in an editor that reveals hidden Unicode characters.
Learn more about bidirectional Unicode characters
This allows us to revert the size increment back to 248 bytes
This file contains hidden or bidirectional Unicode text that may be interpreted or compiled differently than what appears below. To review, open the file in an editor that reveals hidden Unicode characters.
Learn more about bidirectional Unicode characters
Use enum’s ordinal than its name. The generated code writes enum’s name so that it can use Enum.valueOf when reading. We can write an int instead by using enum’s ordinal
This file contains hidden or bidirectional Unicode text that may be interpreted or compiled differently than what appears below. To review, open the file in an editor that reveals hidden Unicode characters.
Learn more about bidirectional Unicode characters
and use Enum.values() when reading. This drops the parcel’s size to 232 bytes.
Skip a class’s parcelable implementation. This of course depends on each implementation. For instance, Status is a sealed class that only one of its children has a construction parameter. We can leverage this by writing only that value
This file contains hidden or bidirectional Unicode text that may be interpreted or compiled differently than what appears below. To review, open the file in an editor that reveals hidden Unicode characters.
Learn more about bidirectional Unicode characters
Fortunately, the generated code does a pretty good job and making any optimizations is not that common. But when needed Parceler and parcelableCreator are great tools.
PS: for measuring the parcel’s size I was using this method
This file contains hidden or bidirectional Unicode text that may be interpreted or compiled differently than what appears below. To review, open the file in an editor that reveals hidden Unicode characters.
Learn more about bidirectional Unicode characters
In the previous post we created FontAwareTextAppearanceSpan. A TextAppearanceSpan descendant that can be used exactly as its parent
This file contains hidden or bidirectional Unicode text that may be interpreted or compiled differently than what appears below. To review, open the file in an editor that reveals hidden Unicode characters.
Learn more about bidirectional Unicode characters
but with the addition that it uses the font found in the provided style.
The thing is that this implementation works only in debug apks or if the project has AGP v4.1 and lower!
Optimizing resources
Android Gradle Plugin 4.2 introduced a number of resources optimizations in order to cut down the apk’s size. One of these optimization is the obfuscation/shortening of their filenames. This means that when the span reads the family name from the style
This file contains hidden or bidirectional Unicode text that may be interpreted or compiled differently than what appears below. To review, open the file in an editor that reveals hidden Unicode characters.
Learn more about bidirectional Unicode characters
instead of getting something like res/font/acme_family.xml it gets res/Zx.xml which breaks completely FontAwareTextAppearanceSpan‘s getFont since it takes for granted that the resource’s name can be extracted from the aforementioned value
This file contains hidden or bidirectional Unicode text that may be interpreted or compiled differently than what appears below. To review, open the file in an editor that reveals hidden Unicode characters.
Learn more about bidirectional Unicode characters
One way to fix this is by adding android.enableResourceOptimizations=false in gradle.properties. This will prevent the optimization from happening thus allowing the extraction of the resource’s name.
But, and this is a big but, this is just a temporary fix since google has announced that from AGP v8 and on the optimizations will be hard forced with no way to change that. You can see it as a message when building while using the flag:
The option setting 'android.enableResourceOptimizations=false' is deprecated.
The current default is 'true'.
It will be removed in version 8.0 of the Android Gradle plugin.
Permanent fix
Turns out that the best way to go is to provide the font’s name ourselfs. In other words there must be a duplication of information since the name already exists in the style.
We could change FontAwareTextAppearanceSpan and pass the name in its constructor but this means that the duplication takes place in many places: in the style and in every instantiation. Also the developer instead of just using the span by providing a style, she needs to open the style, figure out the font’s name and then pass it to the constructor. Manual work that is error prone.
A better approach is to have the duplicated information at the place that gets provided instead the one that gets consumed. This leaves us with the style itself:
This file contains hidden or bidirectional Unicode text that may be interpreted or compiled differently than what appears below. To review, open the file in an editor that reveals hidden Unicode characters.
Learn more about bidirectional Unicode characters
This file contains hidden or bidirectional Unicode text that may be interpreted or compiled differently than what appears below. To review, open the file in an editor that reveals hidden Unicode characters.
Learn more about bidirectional Unicode characters
This way the information gets duplicated once and the developer uses the span as before by just providing the style.
Ofcourse we need to change FontAwareTextAppearanceSpan so that it reads the resource’s name from the style:
This file contains hidden or bidirectional Unicode text that may be interpreted or compiled differently than what appears below. To review, open the file in an editor that reveals hidden Unicode characters.
Learn more about bidirectional Unicode characters
Lets say we want to use a font that is not part of the ones provided by the system.
First we create a family:
This file contains hidden or bidirectional Unicode text that may be interpreted or compiled differently than what appears below. To review, open the file in an editor that reveals hidden Unicode characters.
Learn more about bidirectional Unicode characters
then we add the family in a text appearance style:
This file contains hidden or bidirectional Unicode text that may be interpreted or compiled differently than what appears below. To review, open the file in an editor that reveals hidden Unicode characters.
Learn more about bidirectional Unicode characters
and finally we use the style either in our layout’s XML or through a TextAppearanceSpan:
This file contains hidden or bidirectional Unicode text that may be interpreted or compiled differently than what appears below. To review, open the file in an editor that reveals hidden Unicode characters.
Learn more about bidirectional Unicode characters
Everything renders correctly as long as your min SDK is 26 since this is when the fonts in xml was introduced to the framework:
min SDK<26
When having a min SDK lower than 26 then the first thing that we need to change is our font family file. In particular we must use the app namespace instead of the android one:
This file contains hidden or bidirectional Unicode text that may be interpreted or compiled differently than what appears below. To review, open the file in an editor that reveals hidden Unicode characters.
Learn more about bidirectional Unicode characters
Unfortunately this stops our TextAppearanceSpan from working properly:
it renders the text with all the expected properties except the needed fonts!
Why is that?
TextAppearanceSpan, upon its construction, tries to create a typeface based on the provided font family:
This file contains hidden or bidirectional Unicode text that may be interpreted or compiled differently than what appears below. To review, open the file in an editor that reveals hidden Unicode characters.
Learn more about bidirectional Unicode characters
getFont is added in SDK 26 and if you follow it down to resources you’ll see that it ends up in FontResourcesParser where there is a readFont:
This file contains hidden or bidirectional Unicode text that may be interpreted or compiled differently than what appears below. To review, open the file in an editor that reveals hidden Unicode characters.
Learn more about bidirectional Unicode characters
that tries to get the font’s name by using R.styleable.FontFamilyFont and this is where the namespace makes the difference.
Family name
So what happens when the span cannot create a typeface? In the constructor you’ll see that it loads the provided font family but only its name:
This file contains hidden or bidirectional Unicode text that may be interpreted or compiled differently than what appears below. To review, open the file in an editor that reveals hidden Unicode characters.
Learn more about bidirectional Unicode characters
and that name is being used, when needed, to create a typeface:
This file contains hidden or bidirectional Unicode text that may be interpreted or compiled differently than what appears below. To review, open the file in an editor that reveals hidden Unicode characters.
Learn more about bidirectional Unicode characters
The thing is that Typeface.create loads a font only if it is a systemic one:
This file contains hidden or bidirectional Unicode text that may be interpreted or compiled differently than what appears below. To review, open the file in an editor that reveals hidden Unicode characters.
Learn more about bidirectional Unicode characters
so anything custom does not get found and a default is being used instead.
FontAwareTextAppearanceSpan
So, at this point we know which font we want to load and we need to find a way to use the supported way of getting it.
This file contains hidden or bidirectional Unicode text that may be interpreted or compiled differently than what appears below. To review, open the file in an editor that reveals hidden Unicode characters.
Learn more about bidirectional Unicode characters
This is one way to go. Since we know that all families live in res/font and have a .xml suffix we can clean up the name and use Resource‘s getIdentifier to figure out the font’s resource id. Now we can get the font by calling compat’s function.
What do we gain with this? We can simply replace TextAppearanceSpan with FontAwareTextAppearanceSpan and have our entire project use the new font with the minimum number of changes:
This file contains hidden or bidirectional Unicode text that may be interpreted or compiled differently than what appears below. To review, open the file in an editor that reveals hidden Unicode characters.
Learn more about bidirectional Unicode characters
Or to be exact, multiple RecyclerViews with horizontal orientation inside a RecyclerView where its orientation is vertical.
Easy to implement and works out of box quite well as long as the user swipes gently or flings in an almost straight motion. Unfortunately this is not always the case. Especially when holding the phone with one hand the user tends to swipe with her thumb and in a great velocity ending up in a fling motion that has an arch shape:
user’s motion
This has the result of either moving on the vertical axis or not moving at all in both axes:
All movements in this video are with my right thumb while holding a 6” phone in my right hand. You might have noticed that the user’s experience gets even worse when trying to scroll a list that is positioned either in the bottom or the bottom half of the screen.
The touch flow
But why is that happening? To understand it we must first understand the flow that a single touch event follows starting by defining two things:
Every motion our finger does, either touching the screen, lifting it from it or dragging it along is being translated to a MotionEvent that gets emitted from the framework to our app. More specifically to our active activity.
A gesture is the sequence of motion events that start from touching our finger down, the MotionEvent‘s action is ACTION_DOWN, until we lift it up, the MotionEvent‘s action is ACTION_UP. All intermediate events have the ACTION_MOVE action.
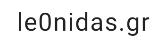
Regular flow
So, when the framework registers a motion event it sends it to our activity which then calls the dispatchTouchEvent method in its root view. The root view dispatches the event to its child view that was in the touch area, the child view to its child and so on so forth until the event reaches the last view in the hierarchy:
touch flow
The view then has to decide if it will consume the gesture by returning true in its onTouchEvent. If it returns false the flow will continue by asking the view’s parent and so on so forth until the event reaches the activity again.
Note that we say consume the gesture and continue here. That is because if the view returns true in the ACTION_DOWN event then all subsequent events, until the gesture’s end (ACTION_UP) will never reach the view’s parents on their way up. They will stop at the view.
Interception
You may ask yourself, what happens if the view’s parent is a scrollable view and the view decides to consume the gesture? Wouldn’t that mean that the parent will never get informed about the user’s movements thus will never scroll?
Correct! That is why the framework allows every view group to intercept an event before it reaches a view. There, the group can decide if it will just keep monitoring the events or stop them from ever reaching its children. This way view groups like ScrollView or RecyclerView can monitor the user’s gestures and if one of them gets translated to a scroll movement, they stop the events from getting to their children and handle them themselves (start scrolling).
The problem
This last part is the root of our bad UX. When the user flings her finger as shown above, the parent RecyclerView, which is always monitoring the emitted events, thinks that it was asked to scroll vertically and immediately prevents all other events from ever reaching the horizontal RecyclerViews while also start to scroll its content.
The solution
Fortunately the framework provides the solution (actually part of it) too.
A child view can ask its parent to stop intercepting and leave all events reach to it. This is done by calling, on its parent, the requestDisallowInterceptTouchEven(true) method. The request will cascade to all the parents in the hierarchy and as a result all events will reach the view.
That’s what we need to do here. All horizontal RecyclerViews need to ask their parents (this will affect the vertical RecyclerView too) to stop intercepting. The question is where to put this request.
Turns out that a OnItemTouchListener is the best place to make the request:
Add an RecyclerView.OnItemTouchListener to intercept touch events before they are dispatched to child views or this view’s standard scrolling behavior.
This way we can act upon an event before reaching the recycler’s content:
This file contains hidden or bidirectional Unicode text that may be interpreted or compiled differently than what appears below. To review, open the file in an editor that reveals hidden Unicode characters.
Learn more about bidirectional Unicode characters
With that we make sure that the moment the user starts a gesture nothing will stop it from reaching a horizontal recycler no matter how quick or slow the gesture is, or what shape it has.
Now you might wonder what happens when the user wants to actually scroll up or down! Well this is when we need to permit the parents to intercept again:
This file contains hidden or bidirectional Unicode text that may be interpreted or compiled differently than what appears below. To review, open the file in an editor that reveals hidden Unicode characters.
Learn more about bidirectional Unicode characters
On ACTION_DOWN except from making the request we also keep the x and y coordinates that the touch occurred. Then while the user drags her finger we try to figure out if the user drags it horizontally or vertically. If it is vertically then it does not concern us (being a horizontal recycler) so we allow our parents (this means the vertical recycler too) to start intercepting again. Now the vertical recycler acts upon the events and takes over the gesture:
after
PS: onTouchEvent is part of View and can only be overridden from custom views. That is why the framework provides a OnTouchListener so that we can consume a gesture in any of the framework’s views since the framework checks if there is a listener first and only if there is none or if it didn’t handle the event it calls onTouchEvent.
There are myriads of blog posts that showcase how to debounce the user’s input by using either rxjava or coroutines. The question is how to implement such a functionality when the project does not have these dependencies?
Debounce
First of all, what is debounce? In essence debounce is a pattern that helps in preventing the repeated execution of a block of code. It does that by adding a delay between two consecutive calls to the block and by cancelling the first call when the second is requested. For example:
When the user types in her keyboard, every key stroke results in calling a block of code that renders what she typed:
without debounce
By having debounce when the user types, each call gets delayed and cancelled if a new one gets requested resulting in rendering the entire text when the user is finished typing:
with debounce
Before starting
We are going to add the debounce functionality to the example above. The initial code is very simple:
This file contains hidden or bidirectional Unicode text that may be interpreted or compiled differently than what appears below. To review, open the file in an editor that reveals hidden Unicode characters.
Learn more about bidirectional Unicode characters
where userInput is the EditText that the user writes in and userResult is the TextView that the user’s input gets rendered.
Adding the debounce functionality
There are two ways to do this. The first uses java’s Timer and TimerTask and the second android’s Handler. Both of them help in implementing the same algorithm:
on every key stroke we first cancel any previous call request
then we setup some kind of timer for our delay and the code that needs to be called
and finally, when the time passes, we make the call
Timer and TimerTask
We can use Timer to schedule the execution of a block of code after a given delay. The provided block must be a TimerTask which will be added to a queue and when the time comes it will be executed in a background thread. This last part is very important since we cannot set anything UI related there. That’s why we use the Timer just for the delay part and then we use the view’s Handler to execute the actual code to the main thread:
This file contains hidden or bidirectional Unicode text that may be interpreted or compiled differently than what appears below. To review, open the file in an editor that reveals hidden Unicode characters.
Learn more about bidirectional Unicode characters
Recommended when there is a need to do some intensive work before returning back to the main thread but besides that it could be an overkill. That’s why it might be better to use the view’s Handler for both the delay and the execution.
Handler
The Handler class packs the same functionality as the Timer. We can use it to add a block of code (being added as a callback in a Message instance) in a queue (the handler’s MessageQueue) and when the time comes the message gets removed from the queue and its callback gets executed in the thread that the handler was created in. In our case, since we are using the view’s handler we can be sure that the execution will take place in the main thread.
The Handler class provides methods for both adding and removing from the queue. So what we end up with is something like this:
This file contains hidden or bidirectional Unicode text that may be interpreted or compiled differently than what appears below. To review, open the file in an editor that reveals hidden Unicode characters.
Learn more about bidirectional Unicode characters
One note about the counter variable. For removing a particular message we need to identify it and to do that we can use what is called a token. When posting for delay, we also provide an id in the form of a counter so that we can request its deletion later on.
Debounce extension
Since we are in Kotlin land and to avoid having the above code duplicated with various global counters for identification we can create an extension function that will pack everything together and help us in having a reusable component and more readable code:
This file contains hidden or bidirectional Unicode text that may be interpreted or compiled differently than what appears below. To review, open the file in an editor that reveals hidden Unicode characters.
Learn more about bidirectional Unicode characters
This file contains hidden or bidirectional Unicode text that may be interpreted or compiled differently than what appears below. To review, open the file in an editor that reveals hidden Unicode characters.
Learn more about bidirectional Unicode characters