Working with checkpoints

There are times that my workflow involves a lot of small and consecutive commits. Commits that their message does not really matter since I will squash them into one that describes my work.

An example is when TDDing a certain functionality. In that case I usually write the test, make it pass and finally make a commit.

Why am I doing that? I see it like small checkpoints. I conclude a part of the functionality so I save it. This helps in restoring my code back to last point that I was happy with its state.

One commit

When I first started working this way I was making a distinct checkpoint for each part. Soon enough I realized that these commits didn’t provide any value. I was making them quick for just saving the code and their message was something like save or checkpoint or t.

So instead of doing this and having to squash lots of commits I started using amend. One commit for the first checkpoint and amend for the rest of them. This way, when I’m finished, I rename the HEAD of the branch to something descriptive and move on.

Lots of steps for one commit

I write my code using an IDE (Android Studio or Intellij IDEA) but when it comes to git I move to a terminal.

This means that for committing I have to (1) move to the terminal, (2) make the proper commit/amend and (3) move back to the IDE. Three steps for one save!

Alt + P

So I decided to fix it.

First the bash script that makes the commit:

#!/bin/bash
CHECKPOINT="checkpoint"
git add .
if [[ "$(git log –format=%B -n 1 HEAD | cat)" == "$CHECKPOINT" ]]; then
git commit –amend –no-edit
else
git commit -m"$CHECKPOINT"
fi
view raw checkpoint.sh hosted with ❤ by GitHub

A simple script that either makes a commit with the message checkpoint or amends the staged changes.

Second the import of this script to the IDE:

The Intellij platform provides a functionality called External Tools:
– Go to Settings -> Tools -> External Tools and click on the add button.
– Set the path of your script where it says Program .
– Disable the Open console for tool output if you don’t want to see the result of your script.

At this point you can either use checkpoint as an action (double shift, type checkpoint) or you can go a step further and create a keyboard shortcut:

Go to Settings -> Keymap -> External Tools -> Right click on the script -> Add Keyboard shortcut.

So now every time I want to create a checkpoint I simple press `Alt + P` and continue working without moving from one program to another!

Bring me both your problems and your suggestions

It’s been a little over a year that I have the role of an engineering manager for the first time in my career. Needless to say that I’m still learning. I read the dos and don’ts and try to incorporate them in my everyday work life. Sometimes everything works fine, some others everything goes wrong!

The don’t I keep doing

The one thing that I often find myself doing is providing, immediately, a solution to a problem that was brought to my attention. No “tell me what you think we should do”, no “what approaches have you tried?”, nothing that will spark a dialogue between me and my report. A dialogue that will helps us to figure things out and grow as engineers.

Figuring something on your own, instead of being told about it, has proven to be vital in understanding it better. So, if I want my reports to grow as engineers, I must lead them to a solution rather than give them one. The aforementioned questions must be my first reaction.

The do we can start doing

this part is a message to all my current and future reports

My hope is that writing about this don’t will make me more conscious about this behavior and avoid doing it. But, we are all humans and it will be better to have a safeguard.

So, what I propose is for you to come to me both with a problem and a suggestion as to how we can solve it. This will keep me from offering an answer right away and, most importantly, it will help you grow as an engineer. Forcing yourself to think about a suggestion or to reflect upon the approaches you’ve taken will make you understand the problem and its domain better. That alone will benefit our discussion or, even better, might lead you in a solution without any help!

Let me be a feedback loop for you

(this post was written with the intent to give it to my current, and future, direct reports in an attempt to establish part of our relationship)

Every time we need to solve a problem (or implement a feature) the process is the same

  1. First we think the approach we are going to follow. This is an abstract flow that we believe will solve the problem.
  2. Based on that we divide our approach to one or more components (modules / classes / functions, whatever suits the size of the problem) and assign a certain behavior to each one of them.
  3. Finally, we start implementing each component.

Feedback loop

How do we know if something we implemented is correct?

By getting feedback. Based on it we make improvements and try again. This loop keeps us on track and allows us to deliver something valuable.

This is why we try to have frequent and short feedback loops. This way any corrections occur sooner than later and we don’t spend time and effort into something that might, potentially, thrown away.

Tech lead as a feedback loop

Looking back to the process of solving a problem we could say that two out of the three steps do have a feedback loop to helps us.

In the implementation step we can argue that the compiler / linter / etc gives us immediate feedback on what we wrote. We fix it and move forward.

For the behavior step we get the feedback through tests. Is the component’s behavior the expected one? How about the components API? Can we use it easily in our tests? Answering these question helps in having solid components.

But what about the approach step? This is where the tech lead comes in.

Right before writing any code, thus putting effort into something, prepare a simple list with the steps you are about to take and discuss them with your tech lead. If there is any feedback use it to improve your approach and have another meeting.

Is it time consuming?
No. In case the approach needs improvement after the implementation the time to fix it will be longer.

Do you feel bad on spending your TL’s time?
Don’t. It is, literally, their job to help you.

Add tests, discover things!

The benefits that you get from testing your code will never cease to amaze me.

I was working on a new feature and part of it required changing one of our oldest classes. The class was still in Java so I decided, before doing any other work, to convert it to Kotlin. There were no tests so my first step was to add them and make sure that the conversion wasn’t going to break anything.

The class is a simple configuration one that

  • setups a couple of its fields upon construction and
  • exposes its validity state

something like this

public final class Configuration {
private final String agent;
private final String header;
private final String version;
public Configuration(final Storage storage) {
this.agent = storage.get(KEY_AGENT);
this.version = storage.get(KEY_VERSION);
this.header = storage.get(KEY_HEADER) + "/" + VERSION_PREFIX + this.version;
}
public boolean isValid() {
if (getAgent().length() == 0) return false;
if (getVersion().length() == 0) return false;
return getHeader().length() != 0;
}
public String getAgent() {
return agent;
}
public String getHeader() {
return header;
}
public String getVersion() {
return version;
}
}

but with many more fields.

Falsely valid

So I started writing tests to cover all cases and the one that failed immediately was

@Test fun `the configuration is not valid when its header is empty`() {
whenever(mockStorage.get(KEY_AGENT)).thenReturn("an agent")
whenever(mockStorage.get(KEY_VERSION)).thenReturn("a version")
whenever(mockStorage.get(KEY_HEADER)).thenReturn("")
val actual = configuration().isValid
assertFalse(actual)
}

at first I thought I had an error in the test but looking closely at the production code I saw the problem. Actually the problems. Plural:

  1. Even thought in this case its subtle, the constructor is violating the SRP. It initializes the fields and makes a decision on what will be exposed. This is a job for the getter.
  2. Which brings us to the second problem. Getters are great way to expose information allowing us to make internal changes without breaking anything outside the class. They help us decouple ourselves from the classes that consume us.
    By using the getters instead of the fields, as in isValid, we couple the class with itself making it depend on what will be exposed and not the actual internal state of the class.

For the record the fix is

public final class Configuration {
private final String agent;
private final String header;
private final String version;
public Configuration(final Storage storage) {
this.agent = storage.get(KEY_AGENT);
this.version = storage.get(KEY_VERSION);
this.header = storage.get(KEY_HEADER);
}
public boolean isValid() {
if (agent.length() == 0) return false;
if (version.length() == 0) return false;
return header.length() != 0;
}
public String getAgent() {
return agent;
}
public String getHeader() {
return header + "/" + VERSION_PREFIX + this.version;
}
public String getVersion() {
return version;
}
}

and we managed to figure it out by writing a small, simple test.

Quick feedback

Having a quick feedback loop is a great way to keep yourself focused on the end result and to make less mistakes on the way. In our profession this is achieved with tests.

This bug was hiding for quite some time so the loop in this implementation was literally years!
Aim for shorter time periods! Seconds is the best and to do that is to write the test along side the production code.

I strongly encourage you to follow TDD but it doesn’t matter if its not your cup of tea. Write it after the production code, just do it immediately after.

Use Parceler to put your parcels on a diet

kotlin-parcelize is a great tool. Its simple to use and it helps in avoiding writing a lot of boilerplate code. There are times though that we need to take control of writing and reading to/from the parcel. One of these times is to cut down a few bytes from it (TransactionTooLargeException I am looking at you).

Meet me in the middle

@Parcelize takes full control and creates everything. Without the annotation, the developer has to do this on her own. Parceler lives in the middle of this spectrum. The plugin will create all necessary methods and classes but the actual write and read to/from the parcel will be the developer’s responsibility.

Without a Parceler the write/read looks like this:

public void writeToParcel(@NotNull Parcel parcel, int flags) {
Intrinsics.checkNotNullParameter(parcel, "parcel");
parcel.writeInt(this.id);
parcel.writeString(this.description);
parcel.writeString(this.priority.name());
parcel.writeParcelable(this.status, flags);
Attachment var10001 = this.attachment;
if (var10001 != null) {
parcel.writeInt(1);
var10001.writeToParcel(parcel, 0);
} else {
parcel.writeInt(0);
}
}
@NotNull
public final Task createFromParcel(@NotNull Parcel in) {
Intrinsics.checkNotNullParameter(in, "in");
return new Task(
in.readInt(),
in.readString(),
(Priority)Enum.valueOf(Priority.class, in.readString()),
(Status)in.readParcelable(Task.class.getClassLoader()),
in.readInt() != 0 ? (Attachment)Attachment.CREATOR.createFromParcel(in) : null
);
}

with a Parceler like this (where the Companion object is acting as a Parceler):

public void writeToParcel(@NotNull Parcel parcel, int flags) {
Intrinsics.checkNotNullParameter(parcel, "parcel");
Companion.write(this, parcel, flags);
}
@NotNull
public final Task createFromParcel(@NotNull Parcel in) {
Intrinsics.checkNotNullParameter(in, "in");
return Task.Companion.create(in);
}

Cutting down parcel’s size

The above-generated code is based on Task

@Parcelize
class Task(
val id: Int,
val description: Description,
val priority: Priority = Normal,
val status: Status = NotStarted,
val attachment: Attachment? = null
) : Parcelable
@Parcelize
class Attachment(val path: String) : Parcelable
@Parcelize
@JvmInline
value class Description(val value: String) : Parcelable
enum class Priority {
Low,
Normal,
High
}
sealed class Status : Parcelable {
@Parcelize
object NotStarted : Status()
@Parcelize
object InProgress : Status()
@Parcelize
class Completed(val completedAt: LocalDate) : Status()
}

which, creates a parcel of 248 bytes. The code does not do anything weird. All primitives, which include the value classes too, are well handled. So nothing to do here. This leaves parcelables and enums.

But first, let’s use a Parceler. This means that writing and reading to/from the parcel has to be implemented by us. For starters, we will do exactly what the generated code does except for the attachment property. For that, the generated code uses parcelable’s methods and CREATOR. In the Parceler we don’t have access to the CREATOR.

companion object : Parceler<Task> {
override fun create(parcel: Parcel): Task {
return Task(
parcel.readInt(),
Description(parcel.readString()!!),
Priority.valueOf(parcel.readString()!!),
parcel.readParcelable(Status::class.java.classLoader)!!,
parcel.readParcelable(Attachment::class.java.classLoader)
)
}
override fun Task.write(parcel: Parcel, flags: Int) {
with(parcel) {
writeInt(id)
writeString(description.value)
writeString(priority.name)
writeParcelable(status, flags)
writeParcelable(attachment, flags)
}
}
}

That leaves us with writeParcelable and readParcelable but now the parcel’s size is bigger, it is 328 bytes! Turns out that writeParcelable first writes the parcelable’s name and then the parcelable itself!

We need to use the CREATOR. After searching around I found parcelableCreator. A function that solved a well-known problem and will be added to Kotlin 1.6.20.

inline fun <reified T : Parcelable> Parcel.readParcelable(): T? {
val exists = readInt() == 1
if (!exists) return null
return parcelableCreator<T>().createFromParcel(this)
}
@Suppress("UNCHECKED_CAST")
inline fun <reified T : Parcelable> parcelableCreator(): Parcelable.Creator<T> =
T::class.java.getDeclaredField("CREATOR").get(null) as? Parcelable.Creator<T>
?: throw IllegalArgumentException("Could not access CREATOR field in class ${T::class.simpleName}")
fun <T : Parcelable> Parcel.writeParcelable(t: T?) {
if (t == null) {
writeInt(0)
} else {
writeInt(1)
t.writeToParcel(this, 0)
}
}

This allows us to revert the size increment back to 248 bytes

companion object : Parceler<Task> {
override fun create(parcel: Parcel): Task {
return Task(
//…
parcel.readParcelable()
)
}
override fun Task.write(parcel: Parcel, flags: Int) {
with(parcel) {
//…
writeParcelable(attachment)
}
}
}

Use enum’s ordinal than its name. The generated code writes enum’s name so that it can use Enum.valueOf when reading. We can write an int instead by using enum’s ordinal

companion object : Parceler<Task> {
override fun create(parcel: Parcel): Task {
return Task(
//…
parcel.readEnum()
)
}
override fun Task.write(parcel: Parcel, flags: Int) {
with(parcel) {
//…
writeEnum(priority)
}
}
}
inline fun <reified T : Enum<T>> Parcel.readEnum(): T {
return enumValues<T>()[readInt()]
}
inline fun <reified T : Enum<T>> Parcel.writeEnum(t: T) {
writeInt(t.ordinal)
}

and use Enum.values() when reading. This drops the parcel’s size to 232 bytes.

Skip a class’s parcelable implementation. This of course depends on each implementation.
For instance, Status is a sealed class that only one of its children has a construction parameter. We can leverage this by writing only that value

companion object : Parceler<Task> {
override fun create(parcel: Parcel): Task {
return Task(
//…
parcel.readStatus()
)
}
override fun Task.write(parcel: Parcel, flags: Int) {
with(parcel) {
//…
writeStatus(status)
}
}
}
fun Parcel.readStatus(): Status {
return readLong().let { value ->
when (value) {
0L -> NotStarted
1L -> InProgress
else -> Completed(LocalDate.ofEpochDay(value))
}
}
}
fun Parcel.writeStatus(status: Status) {
when (status) {
is Completed -> writeLong(status.completedAt.toEpochDay())
InProgress -> writeLong(1)
NotStarted -> writeLong(0)
}
}

this drops the parcel’s size to 136 bytes!

Conclusion

Fortunately, the generated code does a pretty good job and making any optimizations is not that common. But when needed Parceler and parcelableCreator are great tools.

PS: for measuring the parcel’s size I was using this method

fun Parcelable.sizeInBytes(): Int {
val parcel = Parcel.obtain()
try {
parcel.writeParcelable(this, 0)
return parcel.dataSize()
} finally {
parcel.recycle()
}
}

which was shamelessly stolen from Guardian’s TooLargeTool.

This is how I use Todoist

Disclaimer: this is not a paid post. I wrote it because I like the app and find it helpful. I also want to see, in a year, what has changed in the way I use it.

I always have a notebook next to my keyboard. I use it when trying to solve a bug or put in place a new feature. There was also a time that I used it to plan my day or keep notes for things that I wanted to ask or communicate. That didn’t last long since it wasn’t scaling!

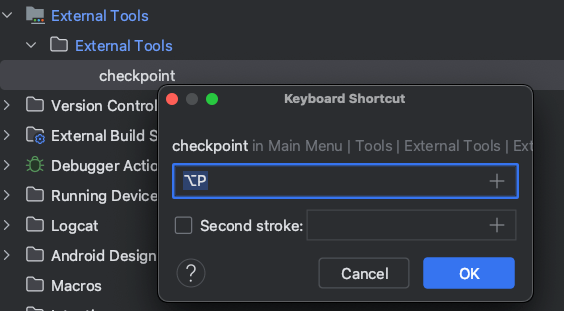
That’s when I decided to move to a digital solution and search for the best to-do app. To be honest I can’t remember how I found out about Todoist. What I do remember though was that I did not check any other apps. Both its amazing human language parser and its shortcuts got me hooked immediately!

My usage

A little context. I use Todoist for over a year and only for work. That means that I don’t take advantage of their projects support. Every task gets added to the #Inbox which is my main driver. Throughout this year I’ve tried many setups and ways to incorporate my needs into the app. Here is how I use it:

Plan my day by setting the tasks that need completion

Every morning I see what needs to be done and create a task for it.

That does not mean that I open the company’s project management tool and copy whatever is assigned to me. I add only what cannot be tracked by the management tool. For instance, if a PR of mine got approved I add a task to merge my work in the main branch.

Also, if a meeting ends up with a couple of actionable items for me, I make sure to add them to Todoist. For example, talk to product about blah blah, comment on this thread, read that article, etc.

Another great source of action items is email. I go by them one by one and if something requires my attention I make a task for it.

Help me build habits

I try to cut down any distractions and one of them is looking at my emails every once in a while. What seems to work for me is to check them in the morning and create, if needed, tasks from them.

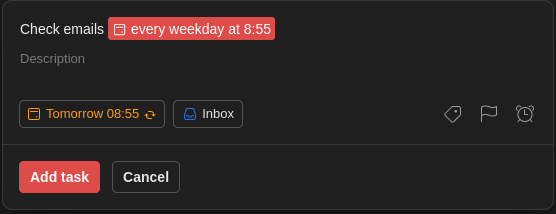
To force me in making it a habit I created a task that reminds me every weekday at 8:55 am to check my emails. This is 5 minutes earlier than when I start working so it gets registered, in my mind, as the first thing to do.

To show you the power of Todoist, for creating this task you need to write:

Check emails every weekday at 8:55

It will know what to do:

Reminders

Having a recurring task with a reminder is a good way to document things that do not belong anywhere else.

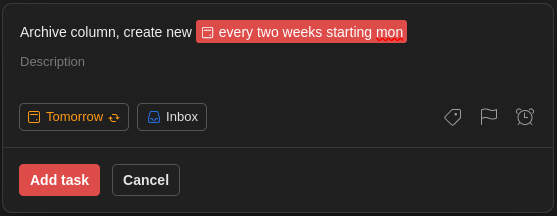
For example, every two weeks, on a Monday, I need to archive a column in our team’s board and create a new one.

Again, you can write it down

Archive column, create new every two weeks starting mon

and Todoist will understand it:

Write topics, questions, thoughts

Not everything is a task that needs completion. There will be topics and questions that must be communicated in a recurring meeting.

This is where I use labels for each meeting type and a task, with no date, for the topic/question.

This way, every time I am in one of these meetings, I open the label and have a list of what I wanted to discuss.

A task with no date and no label is also my way to write down my thoughts/ideas about the project. A possible refactoring, research for a new tool. Things that I need to get off my head but without setting a deadline.

Filters

I couldn’t close this post without mentioning filters. A feature that took me a while to use but can’t live without it anymore.

Better show you what I mean:

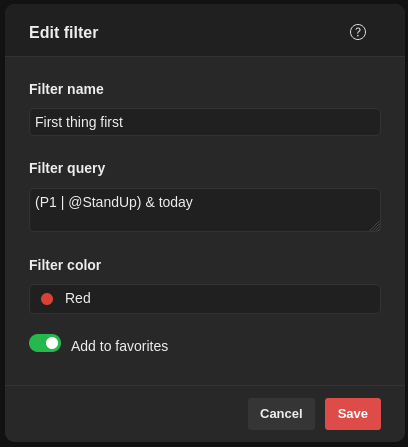
So, this is a filter I run every morning to see:

  • today’s high-priority (P1) tasks or
  • what needs discussion in the team’s stand-up
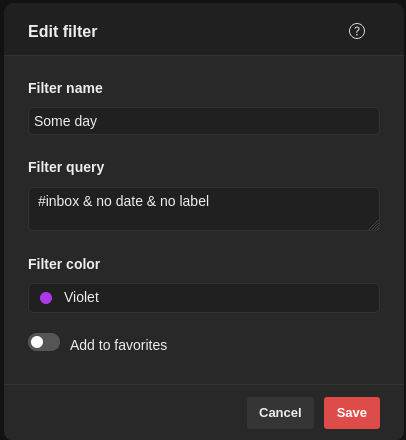
Another example is

that I use to resurface the thoughts and ideas that I mentioned before.

I think that data classes help in violating the YAGNI principle

Let me ask you something. You are the reviewer in a PR that creates a simple calculator which needs to know how to add numbers. Just that. There are no reasons to make us think that the calculator will need more functionality.

Despite that the PR includes a calculator that can add, subtract and multiply. What do you do as a reviewer?

I want to believe that you will, respectfully, discuss the removal of the extra functionality otherwise the calculator will violate the YAGNI principle and add (a) more code for the developers to maintain and (b) more ways to couple the project with the calculator. And all that with no immediate benefit.

Do we need all that functionality?

The same goes with data classes. There is no reason to have a class that can be uniquely identified by all of its properties if we don’t use its instances this way. There is no reason to have an extra getter for every property if we don’t use, extensively, the destructuring declaration. There is no reason to have a copy mechanism if we never copy instances!

If it is there it is going to be used

I recently removed the data keyword from one of our oldest classes and I noticed that many of our newest tests started to fail in compilation. The compiler could not find the copy method which was used to create dummy values from other dummy values by changing one property per test.

When to create a data class?

Here is my thought process when trying to decide the type of class I’ll use:

Q: Is this class anything but a domain entity or value object?

A: Then a simple class is just fine.

Q: Is this class a domain entity? Meaning that it can be uniquely identified by a subset of its properties (ex: an id)?

A: Then a simple class with an implementation of equals/hashCode will be enough.

Q: Is this a value object? Meaning that it can be uniquely identified by all of its properties?

A: Yes.

Q: How many properties?

A: One. Then a value class is a must.

Q: Are you sure its just one?

A: Turns out its more! We’ll use a data class.

Don’t do it for the test

Our test code is the first consumer of our production code. Changing the production code, in this case change/create a class as data, to write more quickly a couple of tests will result in having tests that can easily break every time the production code changes since the tests know too much about the code’s internals and not its behavior.

TextAppearanceSpan with custom font on min SDK 21 – part 2

In the previous post we created FontAwareTextAppearanceSpan. A TextAppearanceSpan descendant that can be used exactly as its parent

textView.text = buildSpannedString {
inSpans(FontAwareTextAppearanceSpan(context, R.style.AcmeText)) {
append(context.getString(R.string.le0nidas_gr))
}
}

but with the addition that it uses the font found in the provided style.

The thing is that this implementation works only in debug apks or if the project has AGP v4.1 and lower!

Optimizing resources

Android Gradle Plugin 4.2 introduced a number of resources optimizations in order to cut down the apk’s size. One of these optimization is the obfuscation/shortening of their filenames.
This means that when the span reads the family name from the style

public TextAppearanceSpan(Context context, int appearance, int colorList) {
// …
if (mTypeface != null) {
mFamilyName = null;
} else {
String family = a.getString(com.android.internal.R.styleable.TextAppearance_fontFamily);
if (family != null) {
mFamilyName = family;
}
// …
}

instead of getting something like res/font/acme_family.xml it gets res/Zx.xml which breaks completely FontAwareTextAppearanceSpan‘s getFont since it takes for granted that the resource’s name can be extracted from the aforementioned value

val cleanFamilyName = family.removePrefix("res/font/").removeSuffix(".xml")

Temporary fix

One way to fix this is by adding android.enableResourceOptimizations=false in gradle.properties. This will prevent the optimization from happening thus allowing the extraction of the resource’s name.

But, and this is a big but, this is just a temporary fix since google has announced that from AGP v8 and on the optimizations will be hard forced with no way to change that. You can see it as a message when building while using the flag:

The option setting 'android.enableResourceOptimizations=false' is deprecated.
The current default is 'true'.
It will be removed in version 8.0 of the Android Gradle plugin.

Permanent fix

Turns out that the best way to go is to provide the font’s name ourselfs. In other words there must be a duplication of information since the name already exists in the style.

We could change FontAwareTextAppearanceSpan and pass the name in its constructor but this means that the duplication takes place in many places: in the style and in every instantiation. Also the developer instead of just using the span by providing a style, she needs to open the style, figure out the font’s name and then pass it to the constructor. Manual work that is error prone.

A better approach is to have the duplicated information at the place that gets provided instead the one that gets consumed. This leaves us with the style itself:

<style name="AcmeText" parent="TextAppearance.MaterialComponents.Body1">
<item name="android:fontFamily">@font/acme_family</item>
<item name="fontFamily">@font/acme_family</item>
<item name="android:textSize">20sp</item>
<item name="fontFamilyName">@string/acme_family</item>
</style>

where fontFamilyName is an attribute:

<attr name="fontFamilyName" format="string" />

This way the information gets duplicated once and the developer uses the span as before by just providing the style.

Ofcourse we need to change FontAwareTextAppearanceSpan so that it reads the resource’s name from the style:

class FontAwareTextAppearanceSpan(
private val context: Context,
private val appearance: Int
) : TextAppearanceSpan(context, appearance) {
private var font: Typeface? = null
override fun updateMeasureState(ds: TextPaint) {
super.updateMeasureState(ds)
val font = getFont() ?: Typeface.DEFAULT
val oldStyle = ds.typeface?.style ?: 0
ds.typeface = Typeface.create(font, oldStyle)
}
private fun getFont(): Typeface? {
if (font != null) {
return font
}
val cleanFamilyName = getFontFamilyName() ?: return null
val appPackageName = context.applicationContext.packageName
val id = context.resources.getIdentifier(cleanFamilyName, "font", appPackageName)
return getFont(context, id).also { font = it }
}
private fun getFontFamilyName(): String? {
val attrs = intArrayOf(R.attr.fontFamilyName)
val a = context.obtainStyledAttributes(appearance, attrs)
val fontFamilyName = a.getString(0)
a.recycle()
return fontFamilyName
}
}

And that is it 🙂 .

TextAppearanceSpan with custom font on min SDK 21

Lets say we want to use a font that is not part of the ones provided by the system.

First we create a family:

<font-family xmlns:android="http://schemas.android.com/apk/res/android"&gt;
<font
android:font="@font/acme"
android:fontStyle="normal" />
</font-family>

then we add the family in a text appearance style:

<style name="AcmeText" parent="TextAppearance.MaterialComponents.Body1">
<item name="android:fontFamily">@font/acme_family</item>
<item name="fontFamily">@font/acme_family</item>
<item name="android:textSize">20sp</item>
</style>

and finally we use the style either in our layout’s XML or through a TextAppearanceSpan:

textView.text = buildSpannedString {
inSpans(TextAppearanceSpan(context, R.style.AcmeText)) {
append(context.getString(R.string.le0nidas_gr))
}
}

Everything renders correctly as long as your min SDK is 26 since this is when the fonts in xml was introduced to the framework:

min SDK<26

When having a min SDK lower than 26 then the first thing that we need to change is our font family file. In particular we must use the app namespace instead of the android one:

<font-family xmlns:app="http://schemas.android.com/apk/res-auto"&gt;
<font
app:font="@font/acme"
app:fontStyle="normal" />
</font-family>

Unfortunately this stops our TextAppearanceSpan from working properly:

it renders the text with all the expected properties except the needed fonts!

Why is that?

TextAppearanceSpan, upon its construction, tries to create a typeface based on the provided font family:

// TextAppearanceSpan:
public TextAppearanceSpan(Context context, int appearance, int colorList) {
// …
mTypeface = a.getFont(com.android.internal.R.styleable.TextAppearance_fontFamily)
// …
}
// TypedArray:
public Typeface getFont(@StyleableRes int index) {
// …
return mResources.getFont(value, value.resourceId);
// …
}

getFont is added in SDK 26 and if you follow it down to resources you’ll see that it ends up in FontResourcesParser where there is a readFont:

private static FontFileResourceEntry readFont(XmlPullParser parser, Resources resources)
throws XmlPullParserException, IOException {
AttributeSet attrs = Xml.asAttributeSet(parser);
TypedArray array = resources.obtainAttributes(attrs, R.styleable.FontFamilyFont);
// …
String filename = array.getString(R.styleable.FontFamilyFont_font);
// …
}

that tries to get the font’s name by using R.styleable.FontFamilyFont and this is where the namespace makes the difference.

Family name

So what happens when the span cannot create a typeface? In the constructor you’ll see that it loads the provided font family but only its name:

public TextAppearanceSpan(Context context, int appearance, int colorList) {
// …
if (mTypeface != null) {
mFamilyName = null;
} else {
String family = a.getString(com.android.internal.R.styleable.TextAppearance_fontFamily);
if (family != null) {
mFamilyName = family;
}
// …
}

and that name is being used, when needed, to create a typeface:

// TextAppearanceSpan
public void updateMeasureState(TextPaint ds) {
// …
if (mFamilyName != null) {
styledTypeface = Typeface.create(mFamilyName, style);
}
// …
}

The thing is that Typeface.create loads a font only if it is a systemic one:

// Typeface
public static Typeface create(String familyName, @Style int style) {
return create(getSystemDefaultTypeface(familyName), style);
}
private static Typeface getSystemDefaultTypeface(@NonNull String familyName) {
Typeface tf = sSystemFontMap.get(familyName);
return tf == null ? Typeface.DEFAULT : tf;
}

so anything custom does not get found and a default is being used instead.

FontAwareTextAppearanceSpan

So, at this point we know which font we want to load and we need to find a way to use the supported way of getting it.

class FontAwareTextAppearanceSpan(
private val context: Context,
appearance: Int
) : TextAppearanceSpan(context, appearance) {
override fun updateMeasureState(ds: TextPaint) {
super.updateMeasureState(ds)
val font = getFont() ?: Typeface.DEFAULT
val oldStyle = ds.typeface?.style ?: 0
ds.typeface = Typeface.create(font, oldStyle)
}
private fun getFont(): Typeface? {
val cleanFamilyName = family.removePrefix("res/font/").removeSuffix(".xml")
val appPackageName = context.applicationContext.packageName
val id = context.resources.getIdentifier(cleanFamilyName, "font", appPackageName)
return ResourcesCompat.getFont(context, id)
}
}

This is one way to go. Since we know that all families live in res/font and have a .xml suffix we can clean up the name and use Resource‘s getIdentifier to figure out the font’s resource id.
Now we can get the font by calling compat’s function.

What do we gain with this? We can simply replace TextAppearanceSpan with FontAwareTextAppearanceSpan and have our entire project use the new font with the minimum number of changes:

textView.text = buildSpannedString {
inSpans(FontAwareTextAppearanceSpan(context, R.style.AcmeText)) {
append(context.getString(R.string.le0nidas_gr))
}
}

Don’t be afraid to throw your work away

There are times, especially in large code bases, that you might be working towards a solution and get stuck because of something that you did not foresee.
That was my case this past week. In order to unblock the development of a new feature I decided to change the API of some classes. The changes would make the integration with the feature much easier and intuitive.

I moved some code, deleted some other, made a few additions and after 3 days I had the API I aimed for. Unfortunately this new API, even though it was great for the new feature, it did not play well with a certain flow. A flow that was not affected by the old API.

In other words by fixing one thing I broke another. So I did the only logical think to do.. I deleted the branch I working on!

Always weigh things

I have to admit that deleting a piece of code that you have worked for hours is not an easy decision. Especially when it looks and behaves as you have designed it. The urge to keep changing things in order to make all flows work is quite strong.

This is where you have to weigh things. Is it worth the effort? Do we have the time to invest? Will the final code be clean, scalable, readable?

In my case the decision to move forward and try to include the broken flow would mean tieing things together (bad code) and also adding a couple more days of work (more time). It wasn’t worth it.

Clean mind

A benefit of throwing a solution is that you can now see the other routes that where there from the start but you were too focused to notice them. Be it that you are no longer occupying your mind with the previous solution’s graph, be it that you have to figure something out, almost always you’ll find another way to tackle things.

In my case the new approach was way simpler and easier. The old API was left untouched and the entire integration was achieved from a different point that up until the deletion I hadn’t given it much attention.

Micro throwing

Throwing implementations is great for small things too like functions or new classes.
Every time I develop one of them, if I start to feel that things are slowing down I don’t think of it much, I just reset --hard and start over (it always helps if you already have a couple of tests to back you up).
Having one route crossed out and knowing, at least some part of the solution, I find the second, third etc implementation to be much faster.