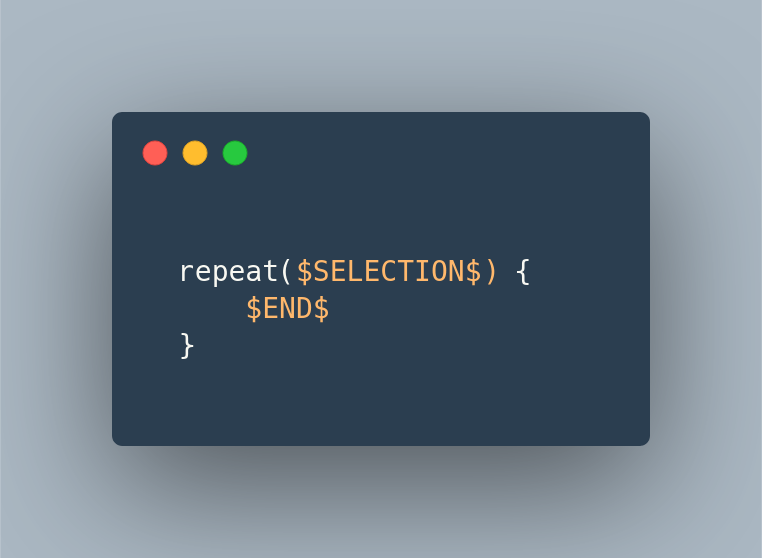
In short, when a template gets invoked, $SELECTION$ gets replaced by whatever is selected at that moment.
I won’t go into details about creating a new template. You can read all about it at Ivan’s post. But when you learn how to create one then add the following:
This way you can do something like this:
PS: the $END$ keyword is another special one that pinpoints where the cursor will stop after adding values for an invoked template
You get a report about a bug. You open the app, follow the steps to reproduce it and, as mentioned in the report, your app is misbehaving. What’s next?
You can either dig immediately in the code and fix the bug or you can re-reproduce the bug, only this time in a test. The second. Always go with the second option.
Here is why:
From now on you will have a regression test. Meaning that if a change in the code breaks what you fixed you’ll get notified from the test suite and not your users
It keeps you focused / You know when you finished. This is a benefit you get from TDD in general. When the test passes the bug is fixed and you can move to your next task. Also, since you have to make the test pass, anything else that popped up during your research for the bug can wait (I usually write it down to a notepad I keep next my keyboard).
You get a better understanding of the code. By trying to write the test you get a better knowledge of how things are connected and communicate. Especially if you are new to a project this will boost your understanding significantly.
You discover more corner cases. There are times that by writing this one test and seeing what inputs a class/function can have, you wonder how will the app behave under certain values. Finish the task at hand and then add a test for each case you want to explore. You might end up solving more bugs!
I wanted to make sure that a function will return null when given a null or empty string and what I ended up doing was something like this:
This file contains hidden or bidirectional Unicode text that may be interpreted or compiled differently than what appears below. To review, open the file in an editor that reveals hidden Unicode characters.
Learn more about bidirectional Unicode characters
@ValueSource does not accept null values so I passed it indirectly!
I didn’t like it so after, finally, reading the JUnit5 documentation I learned that the library had me covered from the beginning by providing three annotations exactly for this use case:
This file contains hidden or bidirectional Unicode text that may be interpreted or compiled differently than what appears below. To review, open the file in an editor that reveals hidden Unicode characters.
Learn more about bidirectional Unicode characters
Lets say we have a simple application that executes certain actions dictated by an external service.
More particular the external service sends a response that looks like this:
This file contains hidden or bidirectional Unicode text that may be interpreted or compiled differently than what appears below. To review, open the file in an editor that reveals hidden Unicode characters.
Learn more about bidirectional Unicode characters
This file contains hidden or bidirectional Unicode text that may be interpreted or compiled differently than what appears below. To review, open the file in an editor that reveals hidden Unicode characters.
Learn more about bidirectional Unicode characters
and there is an executor to help as translate the response to an actual action execution:
This file contains hidden or bidirectional Unicode text that may be interpreted or compiled differently than what appears below. To review, open the file in an editor that reveals hidden Unicode characters.
Learn more about bidirectional Unicode characters
This is an implementation of the Strategy Pattern where every strategy is a certain action allowing us to add as many actions as we want as long as there is a one-to-one relation with what the response sends:
This file contains hidden or bidirectional Unicode text that may be interpreted or compiled differently than what appears below. To review, open the file in an editor that reveals hidden Unicode characters.
Learn more about bidirectional Unicode characters
One day the external service decides to add a print error action but it does not do it by having a new action value. Instead it decides to have an is error flag which must be taken under consideration when the action value is print!
So the response is now this:
This file contains hidden or bidirectional Unicode text that may be interpreted or compiled differently than what appears below. To review, open the file in an editor that reveals hidden Unicode characters.
Learn more about bidirectional Unicode characters
leading us into having an if in the print action’s code
This file contains hidden or bidirectional Unicode text that may be interpreted or compiled differently than what appears below. To review, open the file in an editor that reveals hidden Unicode characters.
Learn more about bidirectional Unicode characters
which defeats the purpose of the strategy pattern and violates the SRP. Each strategy should do one thing and one thing only. By having an if in the strategy we allow it to implement two actions thus having two reasons to change.
Adding a chain
What we need is a way to allow the representation of a single action value from multiple strategies where each one implements a unique action depending on the values of the response.
This is where the Chain of Responsibility Pattern comes in helping as into having multiple actions tied together, passing the response to each other until one of them can execute it.
There are two ways to implement the pattern depending on the size and state of your project.
Using inheritance
If you have a small project with just a few actions and you don’t mind touching many files you can use inheritance and have each action containing the next in the chain:
This file contains hidden or bidirectional Unicode text that may be interpreted or compiled differently than what appears below. To review, open the file in an editor that reveals hidden Unicode characters.
Learn more about bidirectional Unicode characters
This file contains hidden or bidirectional Unicode text that may be interpreted or compiled differently than what appears below. To review, open the file in an editor that reveals hidden Unicode characters.
Learn more about bidirectional Unicode characters
If we do not wish to change any of the existing actions then composition is the only way.
What we need is a way to wrap an existing action in an object that will (a) hold the next action in the chain and (b) decide which action will be executed, the wrapped or the next one:
This file contains hidden or bidirectional Unicode text that may be interpreted or compiled differently than what appears below. To review, open the file in an editor that reveals hidden Unicode characters.
Learn more about bidirectional Unicode characters
This file contains hidden or bidirectional Unicode text that may be interpreted or compiled differently than what appears below. To review, open the file in an editor that reveals hidden Unicode characters.
Learn more about bidirectional Unicode characters
I decided to take a look at GitHub Actions so for the past week I’ve been watching and reading everything about it. I even wrote a post, an Introduction to GitHub Actions. What I found really interesting is the fact that you can write an action using the language you feel more comfortable with. And so I did!
There are three ways to create an action but only the one using Docker allows us to use the language we want.
In all three ways the main two ingredients are:
the action’s code
the action’s metadata, a file called action.yml which is placed in the root folder of your project and defines how the action will run and what inputs/outputs it has.
In our case there is also a third ingredient, a Dockerfile or a docker image which is used by the action’s runner to create a container and execute the action’s code inside it. All you have to do is to make sure that the action’s executable parts are being copied in the container and that are called upon its start.
The runner makes sure that the working space is being mounted to the container (in the state that it was just before the action is started) along with all the environment variables and the inputs the action needs. You can read more in the documentation.
Ktlint PR comments
Action’s code
The action has three distinct parts.
The first part is responsible for using GitHub’s REST API to collect all of the PR’s changes and then keep those that are in Kotlin files and were added or modified. For that I used kscript and I was able to leverage all the libraries that I was accustomed to, like Retrofit and Moshi. When I was happy with the resulted script I used its --package option to create a standalone binary and copy it in the action’s Docker image.
The second part is a combination of bash commands that execute the ktlint binary by passing to it the results of the first part. Ktlint is being called with the --reporter=json parameter in order to create a JSON report.
The third and final part is again a kscript script that uses the report created before and GitHub’s REST API to make a PR line comment for every ktlint error that is part of the PR’s diff. Again a standalone binary was created and put in the image.
Note:
I like kscript since I can write things fast, easy and with all the libraries that I know but I also like writing test first and that proved to be quite difficult. So what I ended up doing was to act as if I was in a Kotlin project. I created my tests (using all my favorites like junit5, hamkrest and MockWebServer) and from that I created .kt files with the proper functionality. And for having a script I created a .kts file where I defined the external dependencies and included the .kt files:
This file contains hidden or bidirectional Unicode text that may be interpreted or compiled differently than what appears below. To review, open the file in an editor that reveals hidden Unicode characters.
Learn more about bidirectional Unicode characters
From the start what I wanted for this action was to be as autonomous as possible leaving very little responsibilities to the consumer and allowing her to just plug it in and watch it play.
For that the only input the action needs is a token, for allowing the kscript scripts to communicate with the API, which will most likely be the default secrets.GITHUB_TOKEN making the action’s usage as simple as adding the following lines in your workflow:
A lot of things must happen in order to have the action ready to run. Sdkman, Kotlin and kscript must be installed, the code needs to be retrieved from the repository and both kscript scripts have to be packaged. On top of that ktlint must be downloaded and placed in the proper path.
For all that, and to shave a few seconds from the action, I decided to have an image that has everything ready. So I created a workflow that gets triggered every time there is a push in the main branch, builds and packs everything in an image and pushes the result to Docker Hub.
So now the action simply uses that image to run a container without any other ceremonies.
Note:
Before using Docker Hub I tried to use GitHub Packages but it turns out that public is not that public* since it requires an authentication to retrieve a package.
Summary
That’s it! An action for having ktlint’s report as comments in your PR. A result of trial and error since I wrote it while learning about actions but I hope that someone might find it useful. If you do let me know!
Github actions is a way to execute one or more tasks every time a certain event occurs. For example, setting reviewers (the task) every time a PR is being opened (the event).
How do I use them?
By creating workflows. A workflow is a .yml file that (a) defines the events that we wish to listen for and (b) describes the jobs that are going to be executed. A job is the task that was mentioned earlier and consists from one or more of steps. Now a step is either a command or an action but more on that in a bit.
Lets see a simple workflow to clarify those definitions:
This file contains hidden or bidirectional Unicode text that may be interpreted or compiled differently than what appears below. To review, open the file in an editor that reveals hidden Unicode characters.
Learn more about bidirectional Unicode characters
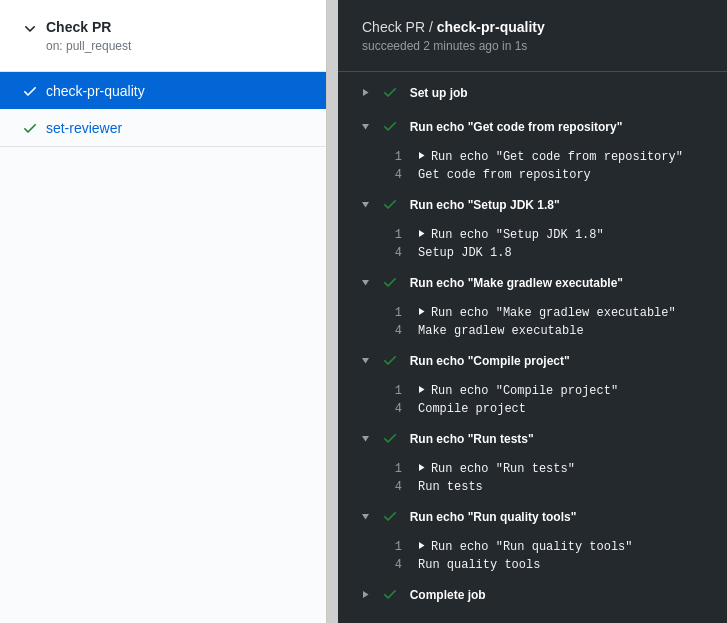
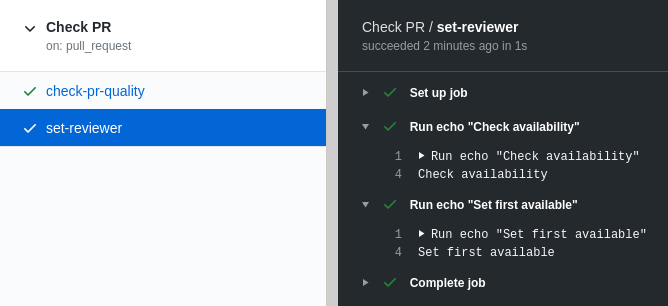
This is a workflow named Check PR that runs every time there is a new or updated PR and executes two jobs (here in parallel but can be configured to execute them sequentially):
The first job, named check-pr-quality, has 6 steps and in each one runs the echo command to print a message.
The second job, named set-reviewer, has 2 steps and, as in the first one, it runs the echo command in each step to print a message.
Admittedly, this is not a valuable workflow but it is a valid one! Just copy and paste it in a .yml file inside your repository under the .github/workflows folder (this is where all workflows should be added) and then create a new PR. After pushing it to GitHub go to the Actions tab you will see something similar to this:
What’s happening under the hood is that for each job:
a new and clean instance of Ubuntu (configured by runs-on key) is being boot up in a virtual machine
we get “landed” in the /home/runner/work/our-repo-name/our-repo-name (no need to remember it, you can use the GITHUB_WORKSPACE environment variable) path ready to start executing the defined steps
Steps
As mentioned earlier a step can either be a command or an action.
A command is everything that can be executed inside the OS. Let’s not forget that we are inside a virtual machine with various tools installed. We can run from simple bash commands like the one we saw (echo) to multiple ones that help as install and run extra software. For example:
this snippet installs sdkman and then uses it to install kotlin. So now our Ubuntu instance has Kotlin!
An action is what we’ll use when a couple of commands won’t be enough. Think of an action like a full fledged program that can have inputs, produce outputs and can be programmed to do pretty much whatever we want.
Lets change the first job in the workflow above by replacing all echo commands with actions and commands that will actually do what was previously just described:
This file contains hidden or bidirectional Unicode text that may be interpreted or compiled differently than what appears below. To review, open the file in an editor that reveals hidden Unicode characters.
Learn more about bidirectional Unicode characters
As before we have a workflow which executes a job that consists from 6 steps.
Only this time we use an action to download our repository to GITHUB_WORKSPACE, an action to setup our java environment, a couple of commands to compile and test our project now that we have it in our workspace (gradlew is part of our project) and an action that will run ktlint and make comments on our PR if there are any errors.
Summary
Think of it like being in a terminal, running and combining multiple commands to produce a result. A job is that terminal and actions are those commands. Mix and match them to automate whatever takes time in your processes.
I’ve used scratch files in IntelliJ IDEA and Android Studio but I think that can be found in all of Jetbrain’s products.
What are they?
Scratch files are files that don’t get tracked by the version control system, can be created at any given time and, most importantly, get bind to the IDE and not the project that is currently open.
How do I create them?
The simplest way is to hit ctrl+alt+shift+insert. If you can’t remember it press shift twice and start writing scratch, you will be presented with the action of creating a new one.
The next step is to choose what kind of file you want to create and this is where it gets interesting since you can choose from a plethora of file types. From plain text, to markdown, Kotlin, JSON, XML, ruby and many many more!
How do I use them?
By choosing the file’s type you choose how the IDE will behave when you are working on it, so if you create a scratch.json and paste some json in it you can format it accordingly. Or if you create a scratch.md you can start writing in markdown and have a preview of your work.
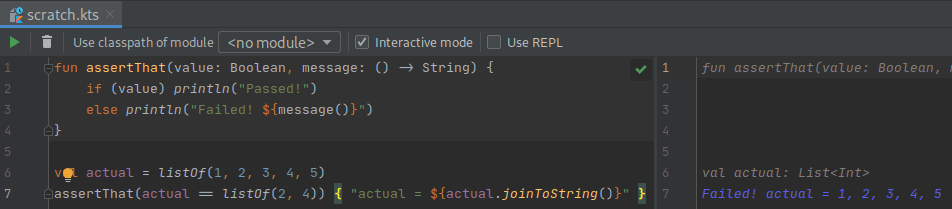
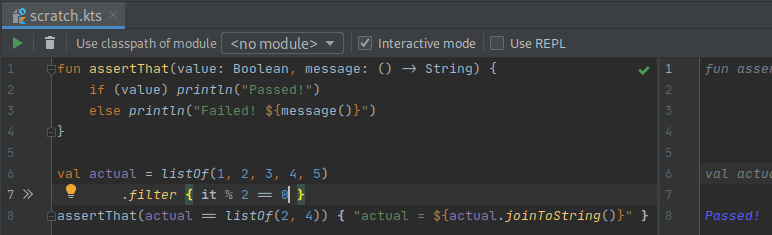
But the most powerful aspect of those files is when you create code related ones. If, for example, you create a scratch.kts file and start writing some Kotlin in it, you will see your code being run on the fly presenting to you its result:
TDDish
You can even work test first if you need to figure out a quick algorithm and have your test run in every change you make!
I usually start with an assertThat function and a failing test and go from there:
Today I came across a piece of code that looked like this:
fun printAll(vararg names: String?) {
  names.forEach { name -> println(name) }
}
and noticed that the IDE did not complain about using names without checking if it is null names?.forEach { ... }!
After decompiling Kotlin’s bytecode I saw that no matter what type I use (String? or String) the java code was the same:
public static final void printAll(@NotNull String... languages) {
  //...
}
Does the Kotlin compiler ignore the nullable type completely? Turns out that yes!
And the reason is quite clear and straightforward but it hadn’t registered in my mind until now:
Note that vararg parameters are, as a rule, never nullable, because in Java there is no good way to distinguish between passing null as the entire vararg array versus passing null as a single element of a non-null vararg array.
This is one of those cases that you go down the rabbit hole and end up doing ten different things before the one that you initially wanted to!
My original intention was to try out kscript. What I ended up doing is learning about dockerfiles, building images and trying to run .kts files without having kscript, or kotlin, installed locally in my machine!
The result
A github repository that you can clone, run the install script and have a kscript executable that works as described here.
Why?
I wanted to play with kscript but did not want to install it on my machine. I don’t like bloating my OS by having libraries and software that might not be used often.
How?
Having everything installed in a docker image and use containers to play with kscript was a one way street for what I wanted to achieve.
Dockerfile
It was my first dockerfile but there are tons of tutorials that helped me out. I ended up using alpine, installing java through its repositories, sdkman using its installation guide and kotlin, kscript through sdkman!
Finally, kscript was added as the image’s entry point which means that every time a container is being run kscript will be the first command that gets executed.
And it worked for the most parts. By executing
docker run –rm -i kscript <params>
rm to remove the container after its done, -i to have the script’s output passed to the terminal
I was able to use kscript as described in its repository, except for the case of having a .kts file!
kscript-router.sh
For the case of a .kts file what turned out to solve my problem was to pass the file’s entire content. And this is part of what kscript-router.sh does. It checks if the first parameter is a .kts file and if so it passes its contents to the container. In every other case it passes all given parameters directly to the container.
install.sh
To tie everything together I added a script that creates the image, adds the router script to the user’s path and creates an alias, named kscript, for executing the router.
A quick way to make a codebase more readable is to extract long or complex conditions / predicates to their own functions. The function’s name will explain to the reader what is being checked allowing her to move forward instead of trying to figure out the context or the calculations that are taking place.
The task
This file contains hidden or bidirectional Unicode text that may be interpreted or compiled differently than what appears below. To review, open the file in an editor that reveals hidden Unicode characters.
Learn more about bidirectional Unicode characters
Lets assume that we have a piece of code that prints all tasks that were created in the last two days and are, as the business experts calls them, completed. Which means that are either Resolved or Cancelled.
This file contains hidden or bidirectional Unicode text that may be interpreted or compiled differently than what appears below. To review, open the file in an editor that reveals hidden Unicode characters.
Learn more about bidirectional Unicode characters
We have two distinct concepts that can be extracted. One that will explain the date calculations and one that will force the business knowledge behind those two statuses.
createdInTheLastTwoDays()
The calculations can be extracted to a private function but since we are using Kotlin we will extract them to an extension function to make the code even more readable:
This file contains hidden or bidirectional Unicode text that may be interpreted or compiled differently than what appears below. To review, open the file in an editor that reveals hidden Unicode characters.
Learn more about bidirectional Unicode characters
Another benefit of having “the mentality of extraction” (yep, I just made it up) is that eventually we will come across a case like the completed which is a business term that has not been transferred to the codebase!
So we don’t just make the code more readable but we improve our domain representation and force a rule that until now was known through documentations or, even worse, through conversations only.
This file contains hidden or bidirectional Unicode text that may be interpreted or compiled differently than what appears below. To review, open the file in an editor that reveals hidden Unicode characters.
Learn more about bidirectional Unicode characters