Use AI _in_ a tool not _as_ a tool

Or to be more exact, use a coding agent in a tool. This is my new starting point every time I begin to think of a tool I want to implement.

Being part of the pipeline

A couple of weeks ago I thought of creating an OpenCode agent that will check my uncommitted changes, construct a commit message and finally make the actual commit.

The first version was ok but I wanted to make a few changes. First I wanted the agent to follow certain guidelines, so I edited the agent file. Then I wanted to change the way it constructed the git command, so I edited the agent file. Finally I wanted to support the usage of GitButler, so I edited the agent file.

At that point I realized that I was violating the single responsibility principle big time. No matter the change I’ve kept editing the same component. And it hit me, fascinated by all the things I was able to do with a coding agent I failed to apply good engineering practices when it comes to the construction of tools.

Small coherent components that do one thing and do it well

When we write code we tend to break it into small modules, classes, functions that have one responsibility and provide a lean API. This way we can reuse components, combine them in different ways and replace them easily.

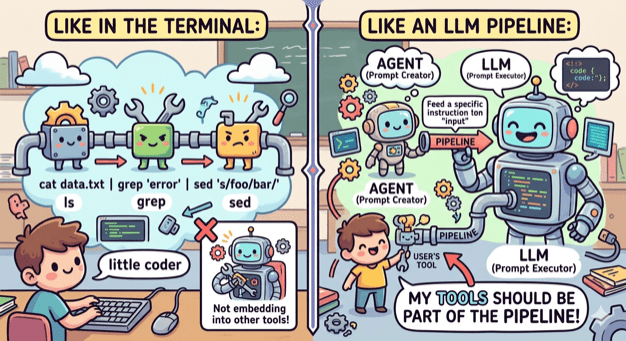
No need to do the opposite when it comes to tooling. The terminal has led the way by having small tools that do one thing (ls, grep, cat etc) and can be combined, by using pipes, into an entire workflow. My tools need to embrace that as well.

ai-commit.sh

So I broke my agent’s workflow into distinct components:

  1. Create a single prompt from collecting all changes. This can be done by a bash script.
  2. Feed the prompt to an agent that is configured to create a title and a message. This can be done by OpenCode with a custom agent.
  3. Get the agent’s output and use it to make a commit using the appropriate tool. This can be done by a bash script.

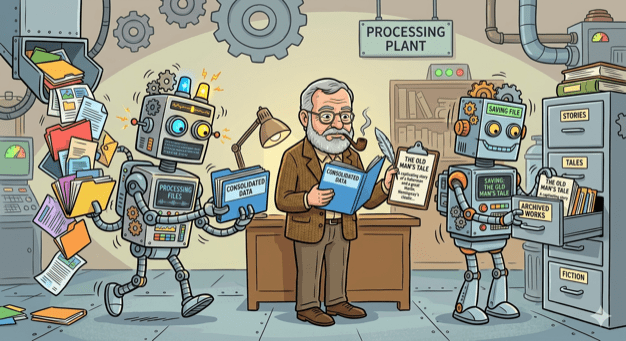
I created the two scripts and also wrote one more that ties everything together: ai-commit.sh

In case you are wondering why Hemingway (or Hemi for the friends) is in the picture, it’s just the name I gave to what was left from the original agent: hemi.md

Pinky and Brain v2

Three months I wrote about Pinky and Brain, my agent/subagent duo that was helping me plan and execute a task while being in the loop. I was using it quite often but whenever I did I also saw the number of my available copilot requests decreasing fast! So I started avoiding it and preferred writing code manually like a caveman.

My setup was a testimony of using coding agent as a tool. It was doing everything. Apart from planning, that should be done by it, it was also looping through tasks, delegating work, making commits, asking for the user’s approval to continue looping. Many of these operations where new requests (x3 because of Opus).

So I sat down and broke that too:

  1. Planning is still being make by an agent (Brain). Only this time it is not tied to a model and it is very restricted. It can only save the created tasks to beads which will be loaded as a skill.
  2. Execution is still being done by an agent (Pinky). Only this time it is even more simpler. It is asked to just follow instructions nothing else.
  3. Everything else is part of a bash script that (a) uses bd to get the next task, (b) provides its description as a prompt to Pinky, (c) closes the task when Pinky returns, (d) uses ai-commit.sh to create a commit, (e) loop again.

I’ve been using it for a couple of weeks now and I’m sure I have a better consumption of requests.

Working with checkpoints

There are times that my workflow involves a lot of small and consecutive commits. Commits that their message does not really matter since I will squash them into one that describes my work.

An example is when TDDing a certain functionality. In that case I usually write the test, make it pass and finally make a commit.

Why am I doing that? I see it like small checkpoints. I conclude a part of the functionality so I save it. This helps in restoring my code back to last point that I was happy with its state.

One commit

When I first started working this way I was making a distinct checkpoint for each part. Soon enough I realized that these commits didn’t provide any value. I was making them quick for just saving the code and their message was something like save or checkpoint or t.

So instead of doing this and having to squash lots of commits I started using amend. One commit for the first checkpoint and amend for the rest of them. This way, when I’m finished, I rename the HEAD of the branch to something descriptive and move on.

Lots of steps for one commit

I write my code using an IDE (Android Studio or Intellij IDEA) but when it comes to git I move to a terminal.

This means that for committing I have to (1) move to the terminal, (2) make the proper commit/amend and (3) move back to the IDE. Three steps for one save!

Alt + P

So I decided to fix it.

First the bash script that makes the commit:

#!/bin/bash
CHECKPOINT="checkpoint"
git add .
if [[ "$(git log –format=%B -n 1 HEAD | cat)" == "$CHECKPOINT" ]]; then
git commit –amend –no-edit
else
git commit -m"$CHECKPOINT"
fi
view raw checkpoint.sh hosted with ❤ by GitHub

A simple script that either makes a commit with the message checkpoint or amends the staged changes.

Second the import of this script to the IDE:

The Intellij platform provides a functionality called External Tools:
– Go to Settings -> Tools -> External Tools and click on the add button.
– Set the path of your script where it says Program .
– Disable the Open console for tool output if you don’t want to see the result of your script.

At this point you can either use checkpoint as an action (double shift, type checkpoint) or you can go a step further and create a keyboard shortcut:

Go to Settings -> Keymap -> External Tools -> Right click on the script -> Add Keyboard shortcut.

So now every time I want to create a checkpoint I simple press `Alt + P` and continue working without moving from one program to another!

kscript from docker

This is one of those cases that you go down the rabbit hole and end up doing ten different things before the one that you initially wanted to!

My original intention was to try out kscript. What I ended up doing is learning about dockerfiles, building images and trying to run .kts files without having kscript, or kotlin, installed locally in my machine!

The result

A github repository that you can clone, run the install script and have a kscript executable that works as described here.

Why?

I wanted to play with kscript but did not want to install it on my machine. I don’t like bloating my OS by having libraries and software that might not be used often.

How?

Having everything installed in a docker image and use containers to play with kscript was a one way street for what I wanted to achieve.

Dockerfile

It was my first dockerfile but there are tons of tutorials that helped me out. I ended up using alpine, installing java through its repositories, sdkman using its installation guide and kotlin, kscript through sdkman!

Finally, kscript was added as the image’s entry point which means that every time a container is being run kscript will be the first command that gets executed.

And it worked for the most parts. By executing

docker run –rm -i kscript <params>

rm to remove the container after its done, -i to have the script’s output passed to the terminal

I was able to use kscript as described in its repository, except for the case of having a .kts file!

kscript-router.sh

For the case of a .kts file what turned out to solve my problem was to pass the file’s entire content. And this is part of what kscript-router.sh does. It checks if the first parameter is a .kts file and if so it passes its contents to the container. In every other case it passes all given parameters directly to the container.

install.sh

To tie everything together I added a script that creates the image, adds the router script to the user’s path and creates an alias, named kscript, for executing the router.

kscript-from-docker

Cherry pick all the commits from a merged branch

I recently had to revert an entire feature and create a new branch that would be merged in the future. In git terms, I had to revert my merged branch, create a new one and cherry pick the reverted commits to it.

I’ve been working with git for years but up until now I never had to revert a commit, let alone an entire branch. Turns out reverting is quite simple and can be done in a single command but cherry-picking all the branch’s commits is a repeatable and tedious task since we need to copy each commit, create a string out of them and give it to cherry-pick.

What I wanted was a way to give git the merge commit and let it figure out which commits to cherry-pick. For example, in the case described below:

I would like to cherry-pick all five commits edaa436, 5d48f23, a8f2b4d, 63f2f4e, 1dc3f6a by just providing to git the commit f51c08c.

I had already done a “custom” git-alias so I figured I could do something similar and create cherry-grab: git cherry-grab f51c08c

commit^

Two things helped in creating cherry-grab and the first one is the ^ suffix that one of its usages is to get the commit’s parent. So if we run git show edaa436^ git will translate it to git show 84f8f45.

In our case where the commit is the result of a merge we can specify which of the two parents we want. f51c08c^1 will be translated to 84f8f45 and f51c08c^2 to 1dc3f6a (in a similar way if we need the nth parent we request it by using ^n).

git rev-list <commit>

The second thing was rev-list which returns a list with all the commits that can be reached through the parent “pointer” starting from the provided commit. So if we run git rev-list edaa436 git will return edaa436, 84f8f45 and 55da68d.

Also, rev-list can exclude all commits that are reachable from a given commit as long as we prefix it with the caret (^) symbol. So if we run git rev-list edaa436 ^84f8f45 git will return just edaa436.

cherry-grab

First we need to get the list with all of the branch’s commits. To do that we will use the rev-list command and request all commits starting from the merge-commit’s second parent but exclude all commits that are reachable from the merge-commit’s first parent:

git rev-list 1dc3f6a ^84f8f45

this returns 1dc3f6a, 63f2f4e, a8f2b4d, 5d48f23, edaa436 which are the commits that construct the merged branch.

Then we need to reverse this list so that we can apply each commit in the proper order:

git rev-list 1dc3f6a ^84f8f45 | tac

which returns edaa436, 5d48f23, a8f2b4d, 63f2f4e, 1dc3f6a.

Having the commits in the correct order we just need to pass them to the cherry-pick command to apply their changes:

git rev-list 1dc3f6a ^84f8f45 | tac | xargs git cherry-pick

Finally we need to put in an alias to make it reusable:

[alias]
cherry-grab = "!f() { \
git rev-list $1^2 ^$1^1 | tac | xargs git cherry-pick; \
}; f"

Nothing fancy or special, we just wrap the sequence of command with a function and tell git to call that function when ever we use the cherry-grab alias.

In order to make it reusable we replace the parent commits with $1^2 and $1^1 respectively which are translated to the second and first parent of the passed commit.

That’s it:

Git alias with parameters

In the company I work we use the gitflow workflow and in every feature branch we make sure that part of its name is the task’s id which includes a unique number. So what we end up with is something like:

feature/T12345-make-the-app-rock

What I wanted was an easy way to checkout a branch using just the number. I wanted (spoiler: and succeeded) something like this:

git ch 12345

Terminal

Lets see how we can checkout a branch without an alias but by using the task’s number.

Get the branch

We can get the branch by listing all branches (git branch) and then grep for the one that contains the task’s number:

git branch | grep 12345

this will return feature/T12345-make-the-app-rock

Checkout to it

Having a way to get the branch makes the checkout quite easy since we can use bash’s command substitution to execute the above commands and use the result directly in the checkout:

git checkout $(git branch | grep 12345)

Put it in a function

We are now able to checkout the task’s branch but it would be nice if we could change the task’s number more easily. Lets create a function and pass the number as a parameter:

f() {
git checkout $(git branch | grep $1)
}
view raw f.bash hosted with ❤ by GitHub
  • The $1 is where the parameter will be used (if we had more parameters we would use $2 for the second, $3 for the third etc).
  • You can check the function by writing it directly in the terminal. Just make sure that you add newlines (press enter):

The alias

We can change branches easily but once we close the current terminal session we lose everything. Our goal is to have all that in a git alias.

Creating an alias can be achieved either by using git config

git config –global alias.ch checkout

or by doing it manually and adding the alias directly into the .gitconfig file (usually located in the home directory). The file should end up with something like:

[alias]
ch = checkout

Having just the alias will not help us much. As is, it will work only if we give it the entire branch:

git ch feature/T12345-make-the-app-rock

What we need is a way to connect the function that we created with the alias.

The answer is provided by git itself since it has a way to create aliases that do not execute a git command but an external command:

However, maybe you want to run an external command, rather than a Git subcommand. In that case, you start the command with a ! character. This is useful if you write your own tools that work with a Git repository.

git docs

Following the docs we can change the gitconfig file to look like this (this time the change must be made only manually because our function will need to have newlines):

[alias]
ch = "!f() { \
git checkout $(git branch | grep $1); \
}; f"

What will happen when we write git ch 12345 is:

  1. git ch will be replaced with everything inside the "..." (minus the !) ending up with two commands
  2. the first one creates the f function and
  3. the second one calls f with the parameter 12345: f 12345

And that’s it! We now have a git alias that will allow us to checkout a branch using part of its name.

feature image by Zach Reiner @ unsplash