Wax on, wax off, paint the fence, paint the house

Kata is a Japanese word meaning “form”. It refers to a detailed choreographed pattern of martial arts movements. It can also be reviewed within groups and in unison when training. It is practiced in Japanese martial arts as a way to memorize and perfect the movements being executed.
Wikipedia

I don’t have a relationship with martial arts so I’ve learned the meaning of kata through code katas. A series of exercises that, through repetition, help in learning and understanding a pattern, an approach or even a technology/tool.

New benefits each time

In my mind a code kata is a list of specific steps that you apply one after the other in order to implement something. You do it enough times and the steps become muscle memory.

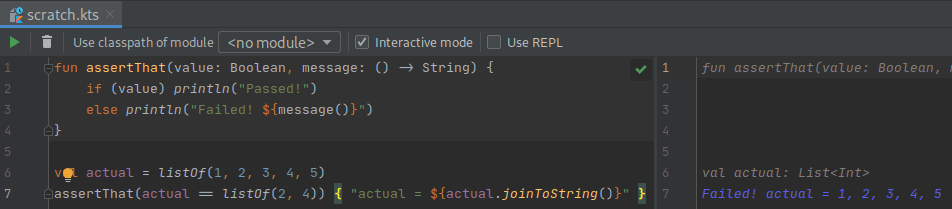
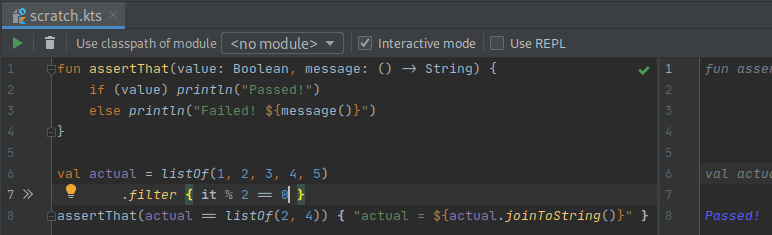
The red-green-refactor cycle, when trying to develop something test first, is one example. Write the test, watch it fail, write the code to make it pass, watch it pass, refactor the code to make it good! My favorite kata for practicing TDD is the Bank.

Another list of steps is when you want to refactor a piece of code. First, you write tests to ensure that your changes will not break the code’s behaviour. Then you start making changes by extracting code to new methods or classes. Each change is followed by an execution of the test suite to make sure that everything still works. Repeat until you are done. My favorite kata for practicing these steps is the Gilded Rose1.

a quick note here: both links above, apart from the exercise, contain a great video that showcases the kata

Practicing a code kata results in building your knowledge bit by bit. You know that each try helps in building that muscle memory and you keep on do it. The first time you simply apply the steps and enjoy the result but from that point on, each new practice helps you to understand why each step is needed. You start feeling more comfortable and begin to experiment by tweaking the steps a bit. Until one day you just know how and when to use the steps.

Be patient Daniel-san

On the other hand Mr. Miyaki’s wax on – wax off approach gives you no immediate knowledge or satisfaction. You simply repeat a small and tedious exercise feeling that there is no meaning in all that. What you don’t realize is that each repetition adds a small brick in building that memory. Until one day you wake up and your reaction is perfect and without you even think about it!

Why am I telling you all that? Because this week I realized that some times we need to be Mr. Miyaki. We need to push ourselves and our colleagues to do, and repeat on doing, the small and tedious change. The change that does not offer an immediate great value but its repetition helps in creating a muscle memory that contributes, at all times, on keeping the project clean and the team focused on the same goal.

“Act as if the API was providing it”

An example of such change is the request I did in a PR where the UI code looked like this (jetpack compose):

if (items.size > 2) {
  Button(...)
}

Here 2 is a hard coded magic number, given by the business and known only by the mobile client. The request was to move this “threshold” to the model that gets created from the API’s response deserialization. Then change both our domain and presentation objects and act as if the API was providing the value all along.

The repetition of this particular wax on/off has three advantages:

  1. It keeps the project’s architecture clean by moving all hard coded values to the outer layer.
  2. It cultivates the thinking that the mobile client must always be dynamic and have everything provided by the API.
  3. If the business decides to play with this threshold, the change in the mobile client will be quick and trivial

“Lets keep using this boolean property”

Another example comes from a discussion I had with a colleague of mine regarding a presentation object that looked like this:

class Foo(
  val title: String,
  val showTitle: Boolean
)

The question was if there is a need to keep the boolean property. Is there a value on having presentation objects that detailed? My answer was yes, there is a value and the repetition of such implementations has its own advantages:

  • It maintains the project’s convention which dictates that a view must be as dummy as possible. The view will not have to use the title to figure out if it has to hide it or not. It just consumes the boolean property.
  • It cultivates a certain approach, when designing such presentation objects, that makes the entire presentation layer more powerful since it handles many aspects of the UI.
  • Having such a layer allows testing to indirectly assert the UI behaviour.
  • That on its own is a good motivation for the devs to write more tests and grow their skills and thinking even more.

Be both Mr. Miyagi and Daniel

Be like Miyagi and push for the repetition. Be like Daniel and keep on doing the exercise even if you think there is no point at it. There will be a time that the change will come naturally and the entire team will have the same mindset. This will keep the project at a great level.

The team will kick a$#:

  1. if you want to practice gilded rose in kotlin I have a repo to help you started ↩︎

Add tests, discover things!

The benefits that you get from testing your code will never cease to amaze me.

I was working on a new feature and part of it required changing one of our oldest classes. The class was still in Java so I decided, before doing any other work, to convert it to Kotlin. There were no tests so my first step was to add them and make sure that the conversion wasn’t going to break anything.

The class is a simple configuration one that

  • setups a couple of its fields upon construction and
  • exposes its validity state

something like this

public final class Configuration {
private final String agent;
private final String header;
private final String version;
public Configuration(final Storage storage) {
this.agent = storage.get(KEY_AGENT);
this.version = storage.get(KEY_VERSION);
this.header = storage.get(KEY_HEADER) + "/" + VERSION_PREFIX + this.version;
}
public boolean isValid() {
if (getAgent().length() == 0) return false;
if (getVersion().length() == 0) return false;
return getHeader().length() != 0;
}
public String getAgent() {
return agent;
}
public String getHeader() {
return header;
}
public String getVersion() {
return version;
}
}

but with many more fields.

Falsely valid

So I started writing tests to cover all cases and the one that failed immediately was

@Test fun `the configuration is not valid when its header is empty`() {
whenever(mockStorage.get(KEY_AGENT)).thenReturn("an agent")
whenever(mockStorage.get(KEY_VERSION)).thenReturn("a version")
whenever(mockStorage.get(KEY_HEADER)).thenReturn("")
val actual = configuration().isValid
assertFalse(actual)
}

at first I thought I had an error in the test but looking closely at the production code I saw the problem. Actually the problems. Plural:

  1. Even thought in this case its subtle, the constructor is violating the SRP. It initializes the fields and makes a decision on what will be exposed. This is a job for the getter.
  2. Which brings us to the second problem. Getters are great way to expose information allowing us to make internal changes without breaking anything outside the class. They help us decouple ourselves from the classes that consume us.
    By using the getters instead of the fields, as in isValid, we couple the class with itself making it depend on what will be exposed and not the actual internal state of the class.

For the record the fix is

public final class Configuration {
private final String agent;
private final String header;
private final String version;
public Configuration(final Storage storage) {
this.agent = storage.get(KEY_AGENT);
this.version = storage.get(KEY_VERSION);
this.header = storage.get(KEY_HEADER);
}
public boolean isValid() {
if (agent.length() == 0) return false;
if (version.length() == 0) return false;
return header.length() != 0;
}
public String getAgent() {
return agent;
}
public String getHeader() {
return header + "/" + VERSION_PREFIX + this.version;
}
public String getVersion() {
return version;
}
}

and we managed to figure it out by writing a small, simple test.

Quick feedback

Having a quick feedback loop is a great way to keep yourself focused on the end result and to make less mistakes on the way. In our profession this is achieved with tests.

This bug was hiding for quite some time so the loop in this implementation was literally years!
Aim for shorter time periods! Seconds is the best and to do that is to write the test along side the production code.

I strongly encourage you to follow TDD but it doesn’t matter if its not your cup of tea. Write it after the production code, just do it immediately after.

Good practices: First write the test then fix the bug

You get a report about a bug. You open the app, follow the steps to reproduce it and, as mentioned in the report, your app is misbehaving. What’s next?

You can either dig immediately in the code and fix the bug or you can re-reproduce the bug, only this time in a test. The second. Always go with the second option.

Here is why:

  1. From now on you will have a regression test.
    Meaning that if a change in the code breaks what you fixed you’ll get notified from the test suite and not your users
  2. It keeps you focused / You know when you finished.
    This is a benefit you get from TDD in general. When the test passes the bug is fixed and you can move to your next task. Also, since you have to make the test pass, anything else that popped up during your research for the bug can wait (I usually write it down to a notepad I keep next my keyboard).
  3. You get a better understanding of the code.
    By trying to write the test you get a better knowledge of how things are connected and communicate. Especially if you are new to a project this will boost your understanding significantly.
  4. You discover more corner cases.
    There are times that by writing this one test and seeing what inputs a class/function can have, you wonder how will the app behave under certain values. Finish the task at hand and then add a test for each case you want to explore. You might end up solving more bugs!

Know your tools: scratch files in IntelliJ IDEA

I’ve used scratch files in IntelliJ IDEA and Android Studio but I think that can be found in all of Jetbrain’s products.

What are they?

Scratch files are files that don’t get tracked by the version control system, can be created at any given time and, most importantly, get bind to the IDE and not the project that is currently open.

How do I create them?

The simplest way is to hit ctrl+alt+shift+insert. If you can’t remember it press shift twice and start writing scratch, you will be presented with the action of creating a new one.

The next step is to choose what kind of file you want to create and this is where it gets interesting since you can choose from a plethora of file types. From plain text, to markdown, Kotlin, JSON, XML, ruby and many many more!

How do I use them?

By choosing the file’s type you choose how the IDE will behave when you are working on it, so if you create a scratch.json and paste some json in it you can format it accordingly. Or if you create a scratch.md you can start writing in markdown and have a preview of your work.

But the most powerful aspect of those files is when you create code related ones. If, for example, you create a scratch.kts file and start writing some Kotlin in it, you will see your code being run on the fly presenting to you its result:

TDDish

You can even work test first if you need to figure out a quick algorithm and have your test run in every change you make!

I usually start with an assertThat function and a failing test and go from there:

failing

Its a simple one but you get the point:

passing