Let me ask you something. You are the reviewer in a PR that creates a simple calculator which needs to know how to add numbers. Just that. There are no reasons to make us think that the calculator will need more functionality.
Despite that the PR includes a calculator that can add, subtract and multiply. What do you do as a reviewer?
I want to believe that you will, respectfully, discuss the removal of the extra functionality otherwise the calculator will violate the YAGNI principle and add (a) more code for the developers to maintain and (b) more ways to couple the project with the calculator. And all that with no immediate benefit.
Do we need all that functionality?
The same goes with data classes. There is no reason to have a class that can be uniquely identified by all of its properties if we don’t use its instances this way. There is no reason to have an extra getter for every property if we don’t use, extensively, the destructuring declaration. There is no reason to have a copy mechanism if we never copy instances!
If it is there it is going to be used
I recently removed the data keyword from one of our oldest classes and I noticed that many of our newest tests started to fail in compilation. The compiler could not find the copy method which was used to create dummy values from other dummy values by changing one property per test.
When to create a data class?
Here is my thought process when trying to decide the type of class I’ll use:
Q: Is this class anything but a domain entity or value object?
A: Then a simple class is just fine.
Q: Is this class a domain entity? Meaning that it can be uniquely identified by a subset of its properties (ex: an id)?
A: Then a simple class with an implementation of equals/hashCode will be enough.
Q: Is this a value object? Meaning that it can be uniquely identified by all of its properties?
A: Yes.
Q: How many properties?
A: One. Then a value class is a must.
Q: Are you sure its just one?
A: Turns out its more! We’ll use a data class.
Don’t do it for the test
Our test code is the first consumer of our production code. Changing the production code, in this case change/create a class as data, to write more quickly a couple of tests will result in having tests that can easily break every time the production code changes since the tests know too much about the code’s internals and not its behavior.
In the previous post we created FontAwareTextAppearanceSpan. A TextAppearanceSpan descendant that can be used exactly as its parent
This file contains hidden or bidirectional Unicode text that may be interpreted or compiled differently than what appears below. To review, open the file in an editor that reveals hidden Unicode characters.
Learn more about bidirectional Unicode characters
but with the addition that it uses the font found in the provided style.
The thing is that this implementation works only in debug apks or if the project has AGP v4.1 and lower!
Optimizing resources
Android Gradle Plugin 4.2 introduced a number of resources optimizations in order to cut down the apk’s size. One of these optimization is the obfuscation/shortening of their filenames. This means that when the span reads the family name from the style
This file contains hidden or bidirectional Unicode text that may be interpreted or compiled differently than what appears below. To review, open the file in an editor that reveals hidden Unicode characters.
Learn more about bidirectional Unicode characters
instead of getting something like res/font/acme_family.xml it gets res/Zx.xml which breaks completely FontAwareTextAppearanceSpan‘s getFont since it takes for granted that the resource’s name can be extracted from the aforementioned value
This file contains hidden or bidirectional Unicode text that may be interpreted or compiled differently than what appears below. To review, open the file in an editor that reveals hidden Unicode characters.
Learn more about bidirectional Unicode characters
One way to fix this is by adding android.enableResourceOptimizations=false in gradle.properties. This will prevent the optimization from happening thus allowing the extraction of the resource’s name.
But, and this is a big but, this is just a temporary fix since google has announced that from AGP v8 and on the optimizations will be hard forced with no way to change that. You can see it as a message when building while using the flag:
The option setting 'android.enableResourceOptimizations=false' is deprecated.
The current default is 'true'.
It will be removed in version 8.0 of the Android Gradle plugin.
Permanent fix
Turns out that the best way to go is to provide the font’s name ourselfs. In other words there must be a duplication of information since the name already exists in the style.
We could change FontAwareTextAppearanceSpan and pass the name in its constructor but this means that the duplication takes place in many places: in the style and in every instantiation. Also the developer instead of just using the span by providing a style, she needs to open the style, figure out the font’s name and then pass it to the constructor. Manual work that is error prone.
A better approach is to have the duplicated information at the place that gets provided instead the one that gets consumed. This leaves us with the style itself:
This file contains hidden or bidirectional Unicode text that may be interpreted or compiled differently than what appears below. To review, open the file in an editor that reveals hidden Unicode characters.
Learn more about bidirectional Unicode characters
This file contains hidden or bidirectional Unicode text that may be interpreted or compiled differently than what appears below. To review, open the file in an editor that reveals hidden Unicode characters.
Learn more about bidirectional Unicode characters
This way the information gets duplicated once and the developer uses the span as before by just providing the style.
Ofcourse we need to change FontAwareTextAppearanceSpan so that it reads the resource’s name from the style:
This file contains hidden or bidirectional Unicode text that may be interpreted or compiled differently than what appears below. To review, open the file in an editor that reveals hidden Unicode characters.
Learn more about bidirectional Unicode characters
Lets say we want to use a font that is not part of the ones provided by the system.
First we create a family:
This file contains hidden or bidirectional Unicode text that may be interpreted or compiled differently than what appears below. To review, open the file in an editor that reveals hidden Unicode characters.
Learn more about bidirectional Unicode characters
then we add the family in a text appearance style:
This file contains hidden or bidirectional Unicode text that may be interpreted or compiled differently than what appears below. To review, open the file in an editor that reveals hidden Unicode characters.
Learn more about bidirectional Unicode characters
and finally we use the style either in our layout’s XML or through a TextAppearanceSpan:
This file contains hidden or bidirectional Unicode text that may be interpreted or compiled differently than what appears below. To review, open the file in an editor that reveals hidden Unicode characters.
Learn more about bidirectional Unicode characters
Everything renders correctly as long as your min SDK is 26 since this is when the fonts in xml was introduced to the framework:
min SDK<26
When having a min SDK lower than 26 then the first thing that we need to change is our font family file. In particular we must use the app namespace instead of the android one:
This file contains hidden or bidirectional Unicode text that may be interpreted or compiled differently than what appears below. To review, open the file in an editor that reveals hidden Unicode characters.
Learn more about bidirectional Unicode characters
Unfortunately this stops our TextAppearanceSpan from working properly:
it renders the text with all the expected properties except the needed fonts!
Why is that?
TextAppearanceSpan, upon its construction, tries to create a typeface based on the provided font family:
This file contains hidden or bidirectional Unicode text that may be interpreted or compiled differently than what appears below. To review, open the file in an editor that reveals hidden Unicode characters.
Learn more about bidirectional Unicode characters
getFont is added in SDK 26 and if you follow it down to resources you’ll see that it ends up in FontResourcesParser where there is a readFont:
This file contains hidden or bidirectional Unicode text that may be interpreted or compiled differently than what appears below. To review, open the file in an editor that reveals hidden Unicode characters.
Learn more about bidirectional Unicode characters
that tries to get the font’s name by using R.styleable.FontFamilyFont and this is where the namespace makes the difference.
Family name
So what happens when the span cannot create a typeface? In the constructor you’ll see that it loads the provided font family but only its name:
This file contains hidden or bidirectional Unicode text that may be interpreted or compiled differently than what appears below. To review, open the file in an editor that reveals hidden Unicode characters.
Learn more about bidirectional Unicode characters
and that name is being used, when needed, to create a typeface:
This file contains hidden or bidirectional Unicode text that may be interpreted or compiled differently than what appears below. To review, open the file in an editor that reveals hidden Unicode characters.
Learn more about bidirectional Unicode characters
The thing is that Typeface.create loads a font only if it is a systemic one:
This file contains hidden or bidirectional Unicode text that may be interpreted or compiled differently than what appears below. To review, open the file in an editor that reveals hidden Unicode characters.
Learn more about bidirectional Unicode characters
so anything custom does not get found and a default is being used instead.
FontAwareTextAppearanceSpan
So, at this point we know which font we want to load and we need to find a way to use the supported way of getting it.
This file contains hidden or bidirectional Unicode text that may be interpreted or compiled differently than what appears below. To review, open the file in an editor that reveals hidden Unicode characters.
Learn more about bidirectional Unicode characters
This is one way to go. Since we know that all families live in res/font and have a .xml suffix we can clean up the name and use Resource‘s getIdentifier to figure out the font’s resource id. Now we can get the font by calling compat’s function.
What do we gain with this? We can simply replace TextAppearanceSpan with FontAwareTextAppearanceSpan and have our entire project use the new font with the minimum number of changes:
This file contains hidden or bidirectional Unicode text that may be interpreted or compiled differently than what appears below. To review, open the file in an editor that reveals hidden Unicode characters.
Learn more about bidirectional Unicode characters
There are times, especially in large code bases, that you might be working towards a solution and get stuck because of something that you did not foresee. That was my case this past week. In order to unblock the development of a new feature I decided to change the API of some classes. The changes would make the integration with the feature much easier and intuitive.
I moved some code, deleted some other, made a few additions and after 3 days I had the API I aimed for. Unfortunately this new API, even though it was great for the new feature, it did not play well with a certain flow. A flow that was not affected by the old API.
In other words by fixing one thing I broke another. So I did the only logical think to do.. I deleted the branch I working on!
Always weigh things
I have to admit that deleting a piece of code that you have worked for hours is not an easy decision. Especially when it looks and behaves as you have designed it. The urge to keep changing things in order to make all flows work is quite strong.
This is where you have to weigh things. Is it worth the effort? Do we have the time to invest? Will the final code be clean, scalable, readable?
In my case the decision to move forward and try to include the broken flow would mean tieing things together (bad code) and also adding a couple more days of work (more time). It wasn’t worth it.
Clean mind
A benefit of throwing a solution is that you can now see the other routes that where there from the start but you were too focused to notice them. Be it that you are no longer occupying your mind with the previous solution’s graph, be it that you have to figure something out, almost always you’ll find another way to tackle things.
In my case the new approach was way simpler and easier. The old API was left untouched and the entire integration was achieved from a different point that up until the deletion I hadn’t given it much attention.
Micro throwing
Throwing implementations is great for small things too like functions or new classes. Every time I develop one of them, if I start to feel that things are slowing down I don’t think of it much, I just reset --hard and start over (it always helps if you already have a couple of tests to back you up). Having one route crossed out and knowing, at least some part of the solution, I find the second, third etc implementation to be much faster.
For example, lets say we have a class that checks if a given task is valid. For reasons that do not interest us that same class makes a connection to another service and sends some data to it. That connection alone makes the class hard to test since we need to have and maintain a connection to that service during testing:
This file contains hidden or bidirectional Unicode text that may be interpreted or compiled differently than what appears below. To review, open the file in an editor that reveals hidden Unicode characters.
Learn more about bidirectional Unicode characters
In this example, isNotAssigned() makes the necessary checks but also sends the task to TaskAssigner so if we want to write some tests for TaskChecker we need to make sure that assigner is up and running.
Object seams
According to Mr Feathers there are three types of seams. The one that fits our case is called object seam and we are going to use it in order to bypass entirely making a connection and talking to the assigner.
Following the book’s example we end up with this:
This file contains hidden or bidirectional Unicode text that may be interpreted or compiled differently than what appears below. To review, open the file in an editor that reveals hidden Unicode characters.
Learn more about bidirectional Unicode characters
which does exactly what we want since it provides a way to write tests that do not involve the assigner. We just need to use TestingTaskChecker in our tests and we are good to go.
The downside with this approach is that we had to open our class which might not meet the project’s standards.
Function reference
Lets see what we can do without opening the class.
Just like before we need to extract the behavior that we want to override to its own method but this time we are also going to assign this method to a value and use the value in the calling site:
This file contains hidden or bidirectional Unicode text that may be interpreted or compiled differently than what appears below. To review, open the file in an editor that reveals hidden Unicode characters.
Learn more about bidirectional Unicode characters
isNotAssigned() will keep talking with the assigner only this time it does it through safeSendTaskToAssigner.
Default value
Having this function reference means that we can force isNotAssigned() to change its behavior by simply assigning a new value to safeSendTaskToAssigner! And this is what we are going to do:
This file contains hidden or bidirectional Unicode text that may be interpreted or compiled differently than what appears below. To review, open the file in an editor that reveals hidden Unicode characters.
Learn more about bidirectional Unicode characters
By default the seam is null which leads in having safeSendTaskToAssigner referencing the original behavior allowing the entire project to keep working as before without any additional changes to other files.
If now we pass a non null value then it gets assigned to safeSendTaskToAssigner and ends up being called instead of sendTaskToAssigner. This way we remove the communication from our flow allowing us to finally write some tests.
Testing
All we need to do is to write our tests by simply creating a checker with a do nothing seam:
This file contains hidden or bidirectional Unicode text that may be interpreted or compiled differently than what appears below. To review, open the file in an editor that reveals hidden Unicode characters.
Learn more about bidirectional Unicode characters
Or to be exact, multiple RecyclerViews with horizontal orientation inside a RecyclerView where its orientation is vertical.
Easy to implement and works out of box quite well as long as the user swipes gently or flings in an almost straight motion. Unfortunately this is not always the case. Especially when holding the phone with one hand the user tends to swipe with her thumb and in a great velocity ending up in a fling motion that has an arch shape:
user’s motion
This has the result of either moving on the vertical axis or not moving at all in both axes:
All movements in this video are with my right thumb while holding a 6” phone in my right hand. You might have noticed that the user’s experience gets even worse when trying to scroll a list that is positioned either in the bottom or the bottom half of the screen.
The touch flow
But why is that happening? To understand it we must first understand the flow that a single touch event follows starting by defining two things:
Every motion our finger does, either touching the screen, lifting it from it or dragging it along is being translated to a MotionEvent that gets emitted from the framework to our app. More specifically to our active activity.
A gesture is the sequence of motion events that start from touching our finger down, the MotionEvent‘s action is ACTION_DOWN, until we lift it up, the MotionEvent‘s action is ACTION_UP. All intermediate events have the ACTION_MOVE action.
Regular flow
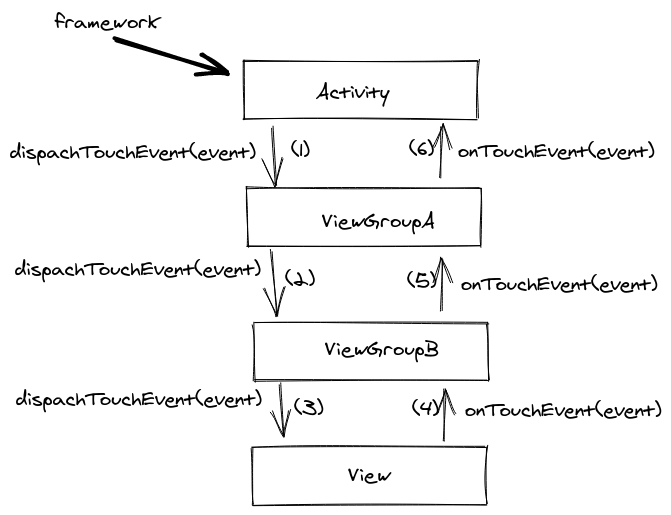
So, when the framework registers a motion event it sends it to our activity which then calls the dispatchTouchEvent method in its root view. The root view dispatches the event to its child view that was in the touch area, the child view to its child and so on so forth until the event reaches the last view in the hierarchy:
touch flow
The view then has to decide if it will consume the gesture by returning true in its onTouchEvent. If it returns false the flow will continue by asking the view’s parent and so on so forth until the event reaches the activity again.
Note that we say consume the gesture and continue here. That is because if the view returns true in the ACTION_DOWN event then all subsequent events, until the gesture’s end (ACTION_UP) will never reach the view’s parents on their way up. They will stop at the view.
Interception
You may ask yourself, what happens if the view’s parent is a scrollable view and the view decides to consume the gesture? Wouldn’t that mean that the parent will never get informed about the user’s movements thus will never scroll?
Correct! That is why the framework allows every view group to intercept an event before it reaches a view. There, the group can decide if it will just keep monitoring the events or stop them from ever reaching its children. This way view groups like ScrollView or RecyclerView can monitor the user’s gestures and if one of them gets translated to a scroll movement, they stop the events from getting to their children and handle them themselves (start scrolling).
The problem
This last part is the root of our bad UX. When the user flings her finger as shown above, the parent RecyclerView, which is always monitoring the emitted events, thinks that it was asked to scroll vertically and immediately prevents all other events from ever reaching the horizontal RecyclerViews while also start to scroll its content.
The solution
Fortunately the framework provides the solution (actually part of it) too.
A child view can ask its parent to stop intercepting and leave all events reach to it. This is done by calling, on its parent, the requestDisallowInterceptTouchEven(true) method. The request will cascade to all the parents in the hierarchy and as a result all events will reach the view.
That’s what we need to do here. All horizontal RecyclerViews need to ask their parents (this will affect the vertical RecyclerView too) to stop intercepting. The question is where to put this request.
Turns out that a OnItemTouchListener is the best place to make the request:
Add an RecyclerView.OnItemTouchListener to intercept touch events before they are dispatched to child views or this view’s standard scrolling behavior.
This way we can act upon an event before reaching the recycler’s content:
This file contains hidden or bidirectional Unicode text that may be interpreted or compiled differently than what appears below. To review, open the file in an editor that reveals hidden Unicode characters.
Learn more about bidirectional Unicode characters
With that we make sure that the moment the user starts a gesture nothing will stop it from reaching a horizontal recycler no matter how quick or slow the gesture is, or what shape it has.
Now you might wonder what happens when the user wants to actually scroll up or down! Well this is when we need to permit the parents to intercept again:
This file contains hidden or bidirectional Unicode text that may be interpreted or compiled differently than what appears below. To review, open the file in an editor that reveals hidden Unicode characters.
Learn more about bidirectional Unicode characters
On ACTION_DOWN except from making the request we also keep the x and y coordinates that the touch occurred. Then while the user drags her finger we try to figure out if the user drags it horizontally or vertically. If it is vertically then it does not concern us (being a horizontal recycler) so we allow our parents (this means the vertical recycler too) to start intercepting again. Now the vertical recycler acts upon the events and takes over the gesture:
after
PS: onTouchEvent is part of View and can only be overridden from custom views. That is why the framework provides a OnTouchListener so that we can consume a gesture in any of the framework’s views since the framework checks if there is a listener first and only if there is none or if it didn’t handle the event it calls onTouchEvent.
…or you’ll end up testing how your code does something and not what it does.
Think of it like a box
No matter what we consider to be a unit, be it a function, a class or an entire module, we should aim in testing it as we intend to consume it in the rest of our code.
This helps us in viewing the unit as a black box that accepts an input and provides an output. We don’t care what’s inside the box. We don’t care how the box handles our input. We only care about the outcome. This is what we need to assert.
Why do we write tests?
We write tests to make sure our code behaves as we intended it to. We write tests to document this behavior. We write tests to have a safety net whenever we wish to change the code but not its behavior.
The key here is behavior. Testing has nothing to do with implementation.
If we expose internal parts of our box we check how the box works and we couple it with our tests meaning that each time we make a change inside the box we have to change our tests too.
By definition this results in losing the ability to refactor.
Test it as it is meant to be used
When consuming a unit of code in production we respect its API and use it as is.
If we start testing individual parts of our box we might be certain that these parts work properly but we don’t know if their integration works too since we have asserted results that where the outcome of a flow that will never occur in our program. In other words we will never consume the API this way.
If testing the box as it’s meant to be used seems difficult then there is something wrong with the box’s API and by exposing code is like hiding all the dirt under the carpet. Eventually we will have to deal with it.
Whenever we need to write asynchronous code we tend to use callbacks which allow us to trigger an action and, instead of waiting for it to finish, get notified through the callback for the action’s completion. Coroutines change that and help us write asynchronous code but in a sequential way.
This means that instead of writing code like this:
This file contains hidden or bidirectional Unicode text that may be interpreted or compiled differently than what appears below. To review, open the file in an editor that reveals hidden Unicode characters.
Learn more about bidirectional Unicode characters
This file contains hidden or bidirectional Unicode text that may be interpreted or compiled differently than what appears below. To review, open the file in an editor that reveals hidden Unicode characters.
Learn more about bidirectional Unicode characters
But what do we do when there is no easy way to remove callbacks from existing code or when we use a third party library that is not coroutines ready? This is where suspendCoroutine comes to save the day.
suspendCoroutine
suspendCoroutine is a function that does exactly what is says. It suspends the coroutine that it was called from and provides a way to resume it.
Lets have an example. The code here:
This file contains hidden or bidirectional Unicode text that may be interpreted or compiled differently than what appears below. To review, open the file in an editor that reveals hidden Unicode characters.
Learn more about bidirectional Unicode characters
This file contains hidden or bidirectional Unicode text that may be interpreted or compiled differently than what appears below. To review, open the file in an editor that reveals hidden Unicode characters.
Learn more about bidirectional Unicode characters
it will print 1 2 3 and then it will just wait. We suspended the coroutine but we did not resume it. To do so we will use the continuation instance that suspendCoroutine provides:
This file contains hidden or bidirectional Unicode text that may be interpreted or compiled differently than what appears below. To review, open the file in an editor that reveals hidden Unicode characters.
Learn more about bidirectional Unicode characters
now it prints 1 2 3 … 4 Done!. The coroutine printed the first three numbers, got suspended, while being suspended another block of code got executed and printed the dots and then resumed the coroutine allowing it to print the final number and done.
Continuation adapter
Back to our first example. Lets say that downloadTasks cannot be changed. We still need to call it and provide a callback for its results.
What we need to do is to suspend the coroutine, call downloadTasks to.. well.. download the tasks and provide a callback that upon completion it will resume the coroutine with the tasks at hand.
To achieve that we first need to create an adapter that will connect the callback with a continuation:
This file contains hidden or bidirectional Unicode text that may be interpreted or compiled differently than what appears below. To review, open the file in an editor that reveals hidden Unicode characters.
Learn more about bidirectional Unicode characters
This file contains hidden or bidirectional Unicode text that may be interpreted or compiled differently than what appears below. To review, open the file in an editor that reveals hidden Unicode characters.
Learn more about bidirectional Unicode characters
That’s it. The adapter resumes the coroutine by providing the tasks that are then returned to the suspension point.
One more thing
Along side suspendCoroutine there is also suspendCancellableCoroutine which provides a cancellable continuation. That means that in addition of resuming we can also execute code upon cancellation:
This file contains hidden or bidirectional Unicode text that may be interpreted or compiled differently than what appears below. To review, open the file in an editor that reveals hidden Unicode characters.
Learn more about bidirectional Unicode characters
There are myriads of blog posts that showcase how to debounce the user’s input by using either rxjava or coroutines. The question is how to implement such a functionality when the project does not have these dependencies?
Debounce
First of all, what is debounce? In essence debounce is a pattern that helps in preventing the repeated execution of a block of code. It does that by adding a delay between two consecutive calls to the block and by cancelling the first call when the second is requested. For example:
When the user types in her keyboard, every key stroke results in calling a block of code that renders what she typed:
without debounce
By having debounce when the user types, each call gets delayed and cancelled if a new one gets requested resulting in rendering the entire text when the user is finished typing:
with debounce
Before starting
We are going to add the debounce functionality to the example above. The initial code is very simple:
This file contains hidden or bidirectional Unicode text that may be interpreted or compiled differently than what appears below. To review, open the file in an editor that reveals hidden Unicode characters.
Learn more about bidirectional Unicode characters
where userInput is the EditText that the user writes in and userResult is the TextView that the user’s input gets rendered.
Adding the debounce functionality
There are two ways to do this. The first uses java’s Timer and TimerTask and the second android’s Handler. Both of them help in implementing the same algorithm:
on every key stroke we first cancel any previous call request
then we setup some kind of timer for our delay and the code that needs to be called
and finally, when the time passes, we make the call
Timer and TimerTask
We can use Timer to schedule the execution of a block of code after a given delay. The provided block must be a TimerTask which will be added to a queue and when the time comes it will be executed in a background thread. This last part is very important since we cannot set anything UI related there. That’s why we use the Timer just for the delay part and then we use the view’s Handler to execute the actual code to the main thread:
This file contains hidden or bidirectional Unicode text that may be interpreted or compiled differently than what appears below. To review, open the file in an editor that reveals hidden Unicode characters.
Learn more about bidirectional Unicode characters
Recommended when there is a need to do some intensive work before returning back to the main thread but besides that it could be an overkill. That’s why it might be better to use the view’s Handler for both the delay and the execution.
Handler
The Handler class packs the same functionality as the Timer. We can use it to add a block of code (being added as a callback in a Message instance) in a queue (the handler’s MessageQueue) and when the time comes the message gets removed from the queue and its callback gets executed in the thread that the handler was created in. In our case, since we are using the view’s handler we can be sure that the execution will take place in the main thread.
The Handler class provides methods for both adding and removing from the queue. So what we end up with is something like this:
This file contains hidden or bidirectional Unicode text that may be interpreted or compiled differently than what appears below. To review, open the file in an editor that reveals hidden Unicode characters.
Learn more about bidirectional Unicode characters
One note about the counter variable. For removing a particular message we need to identify it and to do that we can use what is called a token. When posting for delay, we also provide an id in the form of a counter so that we can request its deletion later on.
Debounce extension
Since we are in Kotlin land and to avoid having the above code duplicated with various global counters for identification we can create an extension function that will pack everything together and help us in having a reusable component and more readable code:
This file contains hidden or bidirectional Unicode text that may be interpreted or compiled differently than what appears below. To review, open the file in an editor that reveals hidden Unicode characters.
Learn more about bidirectional Unicode characters
This file contains hidden or bidirectional Unicode text that may be interpreted or compiled differently than what appears below. To review, open the file in an editor that reveals hidden Unicode characters.
Learn more about bidirectional Unicode characters
Ever since Kotlin introduced coroutines there has been a plethora of posts that showcased their usage in networking or multi threading scenarios. Inevitably many developers when asked what a coroutine is their first answer was “a lightweight thread” or “a way to write clean asynchronous code”. Unfortunately this is not the definition of a coroutine but rather a couple of things that a coroutine can help us with.
Routine (aka Subroutine)
So what is a coroutine? To answer that we must first understand what a routine is.
A routine is nothing more than the common function that we all use every day. Its main characteristic is that its execution must come to a completion before returning to the caller. It does not hold any state and calling it multiple times is like calling it for the first time.
An example:
This file contains hidden or bidirectional Unicode text that may be interpreted or compiled differently than what appears below. To review, open the file in an editor that reveals hidden Unicode characters.
Learn more about bidirectional Unicode characters
On the other hand a coroutine (a concept that is way older than Kotlin) is a function that can hold its current state allowing us to pause and resume its execution at certain suspension points. This can be of great help when we need to write concurrent code, meaning, when we need to run two tasks at the same time by executing small parts of those tasks one at a time.
For example, if we have task A broken in two parts (A1, A2) and task B broken in two parts as well (B1, B2), we can write code that executes first A1, then B1, then A2 and finally B2.
Building a coroutine
Our goal is to convert the above routine into a coroutine and to do so we need to have a blueprint:
This file contains hidden or bidirectional Unicode text that may be interpreted or compiled differently than what appears below. To review, open the file in an editor that reveals hidden Unicode characters.
Learn more about bidirectional Unicode characters
So, step #1 is to separate the states into blocks of code and to do that we are going to use the when statement:
This file contains hidden or bidirectional Unicode text that may be interpreted or compiled differently than what appears below. To review, open the file in an editor that reveals hidden Unicode characters.
Learn more about bidirectional Unicode characters
the problem here is that the code does not compile since the states do not communicate and are missing important information.
To fix it we are moving to step #2 where the state parameter will be used as a vessel to pass data from one state to the other:
This file contains hidden or bidirectional Unicode text that may be interpreted or compiled differently than what appears below. To review, open the file in an editor that reveals hidden Unicode characters.
Learn more about bidirectional Unicode characters
the code now has distinct states that share data but it cannot resume correctly since there is no way to move from one state to the other.
Step #3 addresses that by updating the state’s label allowing the function to resume from where it was paused:
This file contains hidden or bidirectional Unicode text that may be interpreted or compiled differently than what appears below. To review, open the file in an editor that reveals hidden Unicode characters.
Learn more about bidirectional Unicode characters
and that’s it. saveUserTasks is now a coroutine where every call executes a small part of the function allowing us to pause and resume the task:
This file contains hidden or bidirectional Unicode text that may be interpreted or compiled differently than what appears below. To review, open the file in an editor that reveals hidden Unicode characters.
Learn more about bidirectional Unicode characters
We did manage to convert a routine to a coroutine but the example did not show the power of using coroutines which is concurrency. Lets change that.
To make things a little bit easier we are going to package a few common functionalities together
This file contains hidden or bidirectional Unicode text that may be interpreted or compiled differently than what appears below. To review, open the file in an editor that reveals hidden Unicode characters.
Learn more about bidirectional Unicode characters
This file contains hidden or bidirectional Unicode text that may be interpreted or compiled differently than what appears below. To review, open the file in an editor that reveals hidden Unicode characters.
Learn more about bidirectional Unicode characters
This file contains hidden or bidirectional Unicode text that may be interpreted or compiled differently than what appears below. To review, open the file in an editor that reveals hidden Unicode characters.
Learn more about bidirectional Unicode characters
As you can see the two functions are being executed concurrently. First we load the user, then we download the settings, then we load the user’s task and so on and so forth!
Further reading
My goal with this post was to give you a better understanding on what a coroutine is and I did it by using the concept of a finite state machine. The same concept that Kotlin’s implementation of coroutines uses.
For digging in the actual implementation of coroutines I suggest you take a look at a couple of great posts that helped me a lot in grasping the concept: